Stand Alone Pages

Tuesday, March 3, 2015

When to Plant Tomatoes, Peppers and Eggplant?

Traditionally, by the middle of March at around the 2000 foot elevation in southern Nevada, we will have a 90% chance that there will be no more frost. This is normally the date we use for planting warm season vegetables.
Strong and vigorous tomato transplant

You can usually sneak them in a little earlier if you watch the weather forecasts or give them some protection. Tomatoes are warm season crops and they can suffer from chilling injury. This is damage to the plants if temperatures drop close to the same temperature in your refrigerator. Even a bit higher than this.

Hot microclimates in the yard can support please vegetables earlier than the middle of March. So if they are going in a spot that is West or South facing, you can put them in earlier.

Watch for temperatures below 50° F. If temperatures are going to drop this low, there is a potential for chilling injury.

You can use some hot caps and cover them at night when the sun goes down.

White woven crop cover rolled back showing the difference
in plant growth a crop cover can make in spring
You can use a crop cover and lay it over the top of them. These crop covers will give you an extra 5° F over the lowest temperature during the night.

You can throw a light blanket over them if you push in some short stakes to keep the blanket from crushing plants.

Or you can buy the plants and leave them in their containers. Put them outside during the day and move them indoors at night. This way you can delay planting them if you think there might be some low temperatures coming.

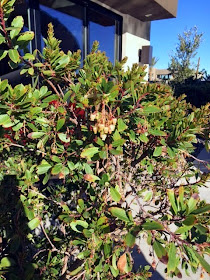
Strawberry Tree Needs Extra Care in the Desert

Q. I have a strawberry tree that is probably getting too much sun. The tips of the leaves are very discolored. Is there anything I can do to help it?

A. Strawberry tree is native to Western Europe and the Mediterranean region. 

Its leaves tend to yellow because of micronutrient fertilizer problems, cold temperatures and intense sunlight. Leaves also tend to scorch on the tips in very hot locations with intense sunlight. They do not perform well in rock mulch in south or western exposures.

Getting this plant closer to optimum health helps it tolerate stresses caused by extreme soil and environmental conditions. Soil improvement and wood surface mulch will help this plant a lot.

This plant should not be in rock mulch. Rock mulches radiate a lot of heat during the summer and add nothing back to the soil. If this plant is in rock mulch, I would pull the rock back a couple of feet and apply an inch or two of compost.

After lightly incorporating the compost into the upper soil surface, I would cover the exposed area with about 3 to 4 inches of wood chips. The combination of compost and decomposing wood chips will help to rebuild the soil around the roots. Rebuilding the soil around the roots improves the biological activity of the soil and overall plant health.

From your picture, the foliage otherwise looks healthy except for its scorched leaf tips. I would guess it is getting adequate amounts of fertilizer.


Applying fertilizers regularly to desert soils is frequently not enough to provide a plant with optimum health. Be sure to add an iron chelate such as EDDHA in a spring application of fertilizer once a year. The combination of the right kind of fertilizer, soil improvement and wood surface mulch will bring this plant closer to optimum health and better tolerance for hot locations.

When Should I Prune My Vitex Tree?

Q. When should Vitex tree be trimmed and how much should be cut?

Vitex in its winter form
A. Vitex blooms in early summer through late June or July. If this plant is pruned with a hedge shears you will likely affect how it blooms this summer.

Larger vitex in late June
Vitex with flowers in June
Any pruning done now should selectively remove entire branches back to a crotch. This is a pruning technique called “drop-crotching”. This technique reduces the size of a plant while still retaining its natural form. Drop-crotching avoids plant injuries due to “topping”.


Vitex in bloom in May
Limbs that add height or size are removed at the juncture with a branch of smaller size. This type of limb removal maintains terminal buds at a lower height, retains flowers and maintains the architecture of the plant.
The opposite of drop-crotching is topping, or shearing the plant at a desired height or size. We do not want to do that to most trees. After reducing the size of Vitex we would remove any crossed branches or broken branches and shape the tree to maintain its symmetry.


Sunday, March 1, 2015

Can I Save My Wind Damaged Tree?

A. yes, both branches can be saved or you can remove one of the larger branches but I know removing a large part of the canopy will make it look ugly.

Repairing this type of damage is best left for professional arborists. 

If you want to tackle this yourself or hire someone to do it under your supervision, then this would be the procedure you would follow. Pay particular attention in getting the right supplies for this type of job. 

Any permanent steel that enters and stays inside the tree should be stainless. Any steel outside of the tree that would be resistant to the environment would either be stainless or galvanized. But it is very important to use stainless on anything in contact with wet tissue inside the tree.

It is also important to make sure that the supplies you use are strong enough. Use American or Western manufactured steel products. Avoid Chinese made steel products. I have been very disappointed in the quality of some of these materials from outside the United States. I realize why they are available but these supplies have to be able to accommodate the bearing load of that tree in future years.

This type of repair to a very large tree is usually beyond the abilities of most homeowners. There is also the possibility of future liability if this work is not done correctly. Having said all that, these are the basic steps that should be taken.

Supplies you will need:

  • stainless steel eye screws with a length long enough to penetrate 1/3 the diameter of the limbs
  • galvanized, stranded wire cable with a working load limit capable of supporting the canopy (for large canopies cabling may need to be done in multiple locations)
  • stainless steel partially threaded rod, washers and nuts

Equipment you will need:

  • chainsaw or arborists handsaw large enough for drop-crotching limbs
  • power drill or manually operated brace
  • wood bit long enough to drill a continuous hole through the split to accommodate the partially threaded rod

1. Reduce the load (weight) on both sides of the split by removing some of the top growth. Use a technique called drop-crotchng to remove top growth. Drop-crotching is selective removal of branches. The removal of these branches is at the “V” where the tallest branches come together with a side branch. Removal of these limbs should be just outside the “collar” of the limb to promote faster healing. Sanitize and disinfect all blades or bits used for entering the tree prior to its use.

2. Drill pilot holes for the eye screws into major limbs for securing the stranded cable. Secure eye screws into the major limbs a distance into the tree of one third the diameter of those limbs. Eye screws should be stainless steel, not galvanized or zinc plated. Large canopies may need two or more locations where eye screws are inserted and cabling is secured.

3. Secure stranded galvanized cable through eye screws and use a block and tackle, come-a-long or winch to pull these major limbs together enough so that the split visually disappears. Treat the top of the split with grafting wax to keep water from penetrating to the inside of the tree. The grafting wax is not permanent but helps keep water out of the crack until compartmentalization of the damaged area can occur. You can also use water-based asphalt sealer.

4. Drill a continuous hole through the trunk at the split. The hole should be continuous to accommodate a steel rod large enough in diameter to assist in bearing the load of the canopy.

5. Insert the stainless steel rod and secure both ends with stainless steel washers and nuts. Tighten the nuts to assist in bearing the load of the canopy.

The tree will eventually engulf the steel rod, washers and nuts. You should remember to notify anyone who might remove the tree that there is a steel rod in the interior at the split.

You can read more information on this and see some pictures of how this is done at:


Black Spot and Rust Not Common in Vegas Roses

Q. Here's the pic of what's going on with my roses.  What do you think?  Black spot or rust?

A.This was sent to me in July, 2014.
I really didn't see any black spot or rust in the picture. Black spot of roses have the typical "black spots" on the leaves and rust are pustules on the leaves that can be rubbed off with your fingers.
Both are more common during the spring, periods of high humidity and too much shade. Usually full sunlight, drip irrigation (no overhead irrigations), watering during early morning hours, fertilizing regularly and our dry conditions seldom lend itself to either disease here.
If you need to put on a preventive treatment on roses in the spring or fall, apply one of these treatments to the leaves: sulfur dust, Neem oil or compost tea.
The damage looks more like spider mites, drought or lack of fertilizer. Make sure roses have an organic surface mulch applied to the top of the soil that decomposes (wood chips), use drip irrigation, water early in the morning and are fertilize during the spring and fall months.