Stand Alone Pages

Thursday, September 10, 2015

Depth of Rock or Wood Mulch Depends on the Size of Mulch

Q. I have been replacing gravel with wood mulch and I have to put the gravel someplace. What thickness of gravel can I place around the plants, none at the trunk, without causing damage?  Also, what is the maximum amount of wood mulch can be place around plants without being detrimental to the plant?

A. The depth of rock mulch depends on the size of the rock; the larger the rock used the deeper rock mulch can be applied. Roots need to “breathe” so there must be an exchange of gases between the roots and the air. This happens through the pore spaces in the soil.
Rock of a larger size can be used as mulch and applied more deeply than smaller rock


            Generally speaking, rock mulch is applied somewhere between 2 to 4 inches deep. If this rock mulch contains “minus” material (e.g., 1/2 inch minus, ¼ inch minus) then apply 2 to 3 inches. If the rock mulch does not contain minus material then apply it 4 inches or more.
            Course mulch without minus material can be applied right up to the trunk. Rock mulch with minus material should not.
            Most information out there tells us not to apply more than 3 to 4 inches of wood chip mulch around trees and shrubs. Where this recommended depth came from I don’t know but it is repeated over and over.

            I have no problems applying 6 inches of wood chip mulch or more around trees and shrubs provided this mulch is kept away from the trunk of the plant a distance of 12 inches during its first four or five years of growth. 

Reattach Broken Limbs Quickly

Q. My newly planted pluot tree produced one fruit this past season. I guess I pulled too hard and the branch where it was attached split. I taped the split back together with electrical tape. When can I remove it?

A. Limbs that have split will never grow back together unless you reattach the broken limbs within a few minutes after the split occurs. Once the crack or split dries, they will never “fuse” back together.
            Plants grow around wounds and surround new growth by burying this damage in older wood. If the split occurs in a strategic location that supports the weight of future limbs and fruit, it will probably never be strong enough to support increasing weight in future years.
Broken peach tree limbs due to the weight of a fruit load

            I don't know how rapidly you got the tape around the wound but if this happens again you must reattach the split tightly in a matter of a few minutes. I like to use the expandable green nursery tape that you can purchase from most nurseries are garden centers.
            I am guessing the split did not grow back together, is still there and the limb no longer structurally strong enough to support fruit or the weight of new branches growing from it. Remove the broken branch with the pruning shears and reshape the tree for future growth.


Replant Ratty looking Photinia This Fall

Q. My red tip Photinia took a beating this first summer after planting. Should I wait until its cooler and cut the down to force new growth or replace them?

A. I would wait until the beginning of October, gently lift them out of the ground, wash the soil away from the root ball, add compost to the soil used for backfilling around the roots and replant them. After replanting them, I would then cut them back to about 6 inches above the soil.

            Photinia can handle our hot desert climate with no problems provided the soil is amended with good quality compost at the time of planting. It also does not like rock mulch. Planted in rock mulch I will give it five years before it starts to look ratty.
            The problem is I don’t know how your plants were planted. Judging from the pictures you sent, the soil surrounding them does not look like it has enough amendment added or the amendment was not very good. Also, I’m not sure if you planted them at the correct depth.
            You can use the existing native soil when planting them. But you must amend this soil with about 50% good quality compost when planting them.
            The rootball taken out of the container should not be placed too deep. It should be the same level as the soil surrounding it. It is very important to thoroughly soak the soil surrounding the plant after planting several times to settle the soil.
            When digging the hole for the plant, it does not have to be deep. Dig it deep enough only to accommodate the rootball. It is far more important to dig that hole wide and amend the soil in that planting hole surrounding the roots.

            Fertilize them once a year in January and use a good quality iron chelate along with your fertilizer.

How to Transplant Joshua Tree

Q. When is the best time to transplant a Joshua tree?

A. The best time is in mid to late spring but could be done in summer. The worst times are fall and early winter months. Stay away from these time periods for planting Joshua.
Joshua tree rootball

            The biggest mistakes made on planting Joshua is watering too often. Joshua's are not the easiest plants to transplant mostly because the roots taken when harvested from the Desert are not very extensive.
            Start with a smaller plant and stake it to keep the roots from moving. Plant them the same depth as they were when they were harvested.
            Amend the existing soil with about 25% compost at the time of planting. They will benefit from improved soils at the time of planting. Water at the time of planting thoroughly and then hold off for at least three weeks before watering again.

            Water no more than about every three weeks in summer. Less often in cooler and colder weather.

Recipe for Prickly Pear Fruit (Tuna) Jam

Q. I remember that you had posted an article about making jelly/jam from the flower pods of the Indian Cactus. I have several of these cacti and would like to try making the jelly/jam. Would you please repost or send me the procedure for doing this.

A. There is a big variation in the quality of fruits produced by cactus. There are selections of Indian Fig cactus or Opuntia or Nopales that produce better quality fruit, better taste, than others. 

One way you can measure this is by bird damage. If the birds are not annihilating your cactus fruit then my guess will be the fruit is not that good. Typically, birds ravage the good ones and seldom touch the ones that are not so good. 
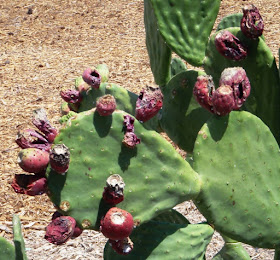
Bird damage to the nopal fruit (tunas) indicating they are a sweet fruit good for eating and preserving.

Sugar content of these fruits or tunas as Mexicans call them can get to a similar range as table grapes or apples. I have attached the book on it that I produced and you can download it. I will also post it on my blog for people to download.

Translated from Spanish so the English is a little awkward.

From M.V. Fernandez and J.C. Morales
University of Sonora-Hermosillo

Jam of Prickly Pear

Ingredients:

2.2 lbs (1kg) of prickly pear fruit (tunas) peeled (15 tunas approximately)
3 1/2 cups of sugar (840 g)
1 tablespoon of pectin
1 tablespoon of lemon juice

Cut prickly pears in pieces and blend only half of them. Keep the rest. (Because the seeds are very hard, I pureed all the fruit and strained the pulp.) Put blended fruit into a pan and cook over medium heat; as soon as it begins to boil, add the pectin, the sugar and the lemon juice. Keep stirring the mixture constantly with the spoon. Once it starts the first boil, while stirring, add the remaining fruit if you desire. Remove the jam from the heat when it acquires a thick consistency and when shaking pan the bottom can be seen (more or less after one hour). Put the hot jam into the sterilized container immediately. (Our test jam cooked more quickly.  Be careful not to overcook.)

Packaging and Preservation for safety

On a dry cloth, place the sterilized bottles or jars. Pour in the still hot jam, with help of a spoon, leaving a minimum space of a half inch between the mouth of the bottle and the jam. Allow some steam to escape and close it tightly to form vacuum. Let cool to room temperature and place a label in the bottle with the product name and date.

Jam will be ready for its consumption in 12 hours after it was prepared. This jam will keep for a year in a fresh and dry place. Once opened, the jam must be refrigerated and consumed in a month.

Alternative ingredients:

The lemon juice can be replaced by ¼ tablespoon of ascorbic acid or one crushed Vitamin C tablet of 500mg.

Recommendations:

To keep the jam in good condition, sterilize the bottles and the cover in the following way: wash them thorougly, retire the labels and put them to boil (with enough water so they keep cover all time) during 15 minutes counted from the first fervor or boiling. Taking off by far care, with the aid of clamps or a knife in a hand and a dry rag in the other; place the bottle and the cover on a totally dry and clean cloth (if no, the bottle can be broken). Do not touch the jam with the hands when it is still hot, since it can cause a serious burn.


To take a small taste of the jam before complete the heat treatment, take a few with a spoon, drain it in a plate, and leave it to cool completely.

Preserving Large Trees When Converting to Desert Landscaping

Q. We are planning on removing our lawn and changing over to desert landscaping but after reading your blog I am wondering how the old, large Modesto Ash trees will fare from this change? Do you think it would be an issue? I tried to find out about their root system, it seems like it is shallow, but won't that be an issue as the roots will be damaged and then covered with hot rocks?

See this posting on my blog:

Large tree suffering die back due to drought after conversion to desert landscaping

A. I am not telling you not to convert to desert landscaping but be cognizant that established trees can get hurt in the process and many landscapers do not know how to convert from lawns to desert landscaping with existing large trees. 

If you have large trees in an established landscape you have some options. 
1. Leave the lawn surrounding the big trees and remove lawn where there are no big trees. 
2. Remove lawn and spiral in-line drip tubing around the existing trees out to a distance of their drip line (spread). However, if you do this you should put this drip tubing on a separate valve and run it longer and less often than drip going to other plants. 
3. Put LOTS of plants beneath these large trees and drip irrigate them to assist the existing trees with enough water. This is above and beyond having emitters for the large trees, too. 
4. Use a lawn irrigation valve to feed bubblers to existing trees and form a basin around the trees to capture water from the bubblers. This is called basin/bubbler irrigation and is a form of flood or border irrigation. The basins must be level and flat and be three to four inches thick.

HOA Replacement Trees for Privets, Ash and Sycamore

Q. I am on our landscape committee for a Henderson, Nevada, HOA. Needing professional advice, I thought of you immediately, as a longtime resident I read your weekly column and read your blog.  This fall we are going to remove many dead and diseases trees in our small community. Mostly privets that thru the years have died after we converted to desert landscape from grass. Others are mainly Russell Ashes that are diseased and or have dead limbs and with pruning look terrible, lopsided, etc. I am without hope that with the pruning done they will ever pull out of it. The various landscapers thru the years used the ashes as replacements and as I have read in your column are no longer considered a good choice. Most of all our yards in our small community face either East or West. We have been advised to replace the trees with Fruitless Olives or Living Oak. All yards are small and have rock mulch. As many other communities we are cash poor and need to make a wise decision, because it will be expensive. We will be replacing approximately 25-30 trees. The other mature 15 yr. old trees in our landscape are sycamore and for the most part doing well, along with a few other Desert Willows,etc.  We are looking for evergreen, shade trees if possible.

Thank
you so much,

I forwarded this email to a certified horticulturist working here in southern Nevada. She has worked with plant selection for a number of years and enjoys answering this type of question.I do want to mention that sycamores are a poor choice as a landscape tree for single-story or even two-story residences. They just get too tall, they consume a lot of water and require a lot of maintenance because they are out of their climate zone. In my opinion they should not be planted in hot desert climates and desert soils. They are a larger scale tree and require big properties to look good. They do well in arid climates provided there is enough water for them. Certainly they should not be planted in large quantities.
Bob Morris
Sycamore near south facing wall with heat damage to the leaves facing the wall

A. Bob Morris forwarded your email to me.  I am Andrea Meckley, a certified horticulturist working here in the Las Vegas area since 1992.  I understand your situation with the privet trees doing poorly.  Since you are going through the expense of replacement I realize you want to make good choices.  Below are a few thoughts:

1. Fruitless Olives:
                  Pros:  evergreen,  little leave drop  
                 Cons:  slow grower,  sometimes they will fruit even though they are not supposed to.  If this happens you can apply a solution to stop them from fruiting if it concerns you.

2.  Southern Live Oak:  
                 Pros:   evergreen
                 Cons:  slow grower, debris from leaves and acorns

Between the two above I would choose the Olive.  

Since you have existing Sycamore and Desert Willow trees that are deciduous, I would also consider the following medium size evergreen and semi-evergreen trees:  Xylosma tree (Xylosma congestum), Holly Oak (Quertcus ilex), Blue Palo Verde (Parkinsonia florida) , Desert Museum Palo Verde (Parkinsonia 'Desert Museum'), Bay Laurel standard trunk tree (Laurus nobilis), and Shoestring Acacia (Acacia stenophylla) which may be a little messy.  One good source for good pictures and more information can be seen at snwa.com under 'landscapes' and then under 'plant search'.  Please contact me if you wish to discuss further.

Hope this helps. 

Andrea Meckley, CH

imn2plants@aol.com 

Trees for Privacy and Hummingbirds

Q. Putting landscape in backyard of new home in a couple of weeks what type of trees do you suggest that will give me privacy and not shed all leaves in the fall also trees and shrubs that attract hummingbirds.

I am not fond of making tree recommendations so I am ccing this to Andrea who loves to do that kind of thing. Good luck!
Bob Morris

A. I am Andrea Meckley, a certified horticulturist working her in the Las Vegas Valley in the green industry since 1992.   Attached is a Hummingbird Plant list.  Also is attached the middle pages of a publication called Trees for Tomorrow.  

Without knowing more details on the tree you want, I suggest you check it out.  I could not scan the whole list of large trees so if you need that info go to www.lasvegasnevada.gov/files/trees.pdf  That website address will also give you pics and more info on each tree.  

I assume you want a small to medium size tree.  Since you want a tree with leaves all year, start with trees labeled 'evergreen' in the 'tree type' column.  Narrow the choices depending on flowers (some debris), water use, thorns, etc. according to chart.  Also visiting demonstration gardens is a good reference tool to use in choosing plants.  We have the Springs Preserve and Master Gardner Demonstration gardens in Las Vegas and Acacia Park in Henderson.


Please Define Deep Watering

Q. Please define "deep watering." In particular, how would you describe "deep watering" a pomegranate bush with a 3" to 4" trunk?

A. Good question. I throw these terms around and I assume people know them or understand them when they don't.
            Deep watering is talking about applying enough water in one irrigation so that the entire root system becomes wet. When deep watering it is also accompanied by less frequent irrigations. This means giving the soil and roots a chance to dry somewhat before the next irrigation.
            There are two ways to water. One way is to give a small amount very often, perhaps daily or twice a day.
            The other way is to apply a large amount and then wait a long time before you give it more. The second way is preferable to the first way for plants that are deep-rooted. Deep-rooted plants are larger, woody plants such as all trees, all large and medium-sized shrubs, all woody vines, and all woody groundcovers.
            Water these types of plants deeply by applying enough water so that the applied water drains to a depth of 18 to 36 inches. The water is then shut off until that soil begins drying. Technically, the plant is not watered again until about half of the water in the soil has been used.
            When half the water is gone, water is applied again until it reaches the same depth as before. This is a continual cycle with the number of days between irrigations decreasing as it gets harder and increasing as it gets colder.
            Deep watering normally applies to woody plants but not to lawns, flowerbeds, vegetable beds and small fruits like strawberries. These are shallow rooted plants and their applied irrigation water is shallow, not deep.

 Deep watering a pomegranate that has a 1 inch diameter trunk is really no different than deep watering a pomegranate with a 3 to 4 inch trunk. Water is applied to the same depth with both of these trees. 

The difference between them is where the water is applied and the amount. In the case of a pomegranate with a 1 inch diameter trunk, we might use only two drip emitters. Two drip emitters might deliver enough water to the soil under the canopy while it is small. 

However, when the pomegranate gets to 3 to 4 inches in diameter, more emitters are needed because the larger tree requires more water. These emitters are spaced far enough apart so that the water is applied over a greater area under the canopy of the tree. The number of minutes on the irrigation clock may not of changed but the number of emitters has so the larger tree now gets more water.

Nutgrass or Nutsedge Difficult to Kill with Chemicals

Q. I have tried digging this weed up but it comes back. I have tried both Roundup and Spectracide according to the package directions, and even painting it on the foliage full strength.
Although it starts out pretty small, if I miss pulling one up, they get quite large. Any assistance in getting rid of this plant is greatly appreciated.
Judging from the roots which actually look like a rhizome I believe this is nutgrass.


A. Judging from the pictures you sent this is one of the nutgrasses or nutsedge. The roots sure look like it to me. To be sure if it is one of the sedges and not a grass, cut the top of the weed off at its stem just below the leaves. Roll the stem between your fingers and see if the stem is triangular rather than round.
            Sedges have triangular stems in cross section. Rolling the stem between your thumb and first finger you should “feel” the triangular bumps of the stem and the stem should not feel round.
Nutgrass with nut attache to the rhizome or "root".

            Sedges, like nutgrass, are more difficult to kill than grasses. Nutgrasses have underground “nuts” attached to the “roots” which are really underground stems called rhizomes. These nuts grow into new plants if they are separated from the mother plant or the mother plant is killed.
            This is why pulling, hoeing or using chemical weed killers do not work on this plant. As you have found out, spraying the tops with Roundup or dandelion killer “burn” the tops back but release the growth of the nuts.
Triangular stem of nutgrass in cross section.

            These nuts are usually anywhere from 4 to 8 inches below the soil surface. All you have done is kill the mother plant and the baby plants released from the nuts that pop from the ground grow like they are on Red Bull. Pulling nutgrass from the soil easily separates the nuts from the mother plant with the same result.
            What to do? There are two basic approaches toward getting some control. The first is soil replacement. If it’s a small area, you can dig down 12 to 14 inches deep, remove the soil and replace it with clean soil. You can take the soil and put it in a clear plastic bag in the middle of summer and “cook” it using the sun.

            You can starve out the nuts. If you continue to remove the tops at the soil surface, over and over, before they get more than two or 3 inches tall it is possible to exhaust or starve the nuts so that they die. If you pursue this option you have got to stay on top of it or it will not work

Palm Tree Roots Exposed – No Problem

Q. This is the pics of the palm tree roots. Why are the roots growing above the surface? Is it an issue and can I do anything to correct it? 


A. This is very common among palm trees and nothing to be alarmed about. You can leave them be or if you don't like the look of it then mulch the surface of the soil 5 inches deep with a wood chip mulch. The palms will benefit from that mulch. It's an aesthetic issue and not a palm tree
management issue.