Stand Alone Pages

Tuesday, June 27, 2017

Tracking Down Possible Disease Problem in Tomato

 This was an exchange regarding a tomato problem. The first exchange..Q1... I did not have pictures to go on. The second exchange Q2....I was sent pictures. Pictures help alot!! Still not sure what it is exactly and only a plant pathologist would know for sure but sanitation recommendations and buying transplants from a good grower are still good suggestions....Xtremehort

Q1. Most of my 12 tomato plants have developed. A light brown appearance on their leaves. It looks kind of like they have dirt on them.  The fruit all looks normal. Any suggestions?

A1. It is difficult to identify a problem without seeing it unless something just jumps out at you. In this case it doesn't. But let me tell you how I would approach it. From your description, I don't think it's a disease problem. It could possibly be an insect or spider might problem. re{ you mention dust

I would spray the leaves with a soapy water solution. Insecticidal soaps are my first choice. My second choice is to make your own using a liquid Castile soap and water at a rate of about 1 tablespoon per gallon. Spray both the tops of the leaves as well is the bottom of the leaves. Soaps are very lethal to insects. They kill good ones and bad ones equally and don't discriminate.

In your case I don't think these are good insects. I am leaning towards spider mites if it has been hot and dry lately Or if you sprayed an insecticide on them lately. Make sure that you feed tomato plants once a month lightly with a fertilizer. Either apply it to the soil or sprayed on the leaves during early morning or early evening hours.

Q2. Mine is a backyard garden with limited space.  I grow six plants in the ground and 4 more in big pots. I add a couple cubic feet of garden soil every year. Don't have many options. I suspected the issue came from the nursery. They are into quantity rather than quality. So, is there anything I can do at this point to treat the plants?
Here are two pictures, one taken in the sun and the other in the shade. Thanks for your response.

A2. Thanks for the pictures. It helped. Notice how the brown spots are closely associated with the leaf veins. That is important and indicates to me a tomato disease problem. It is difficult to tell from pictures but I am leaning towards bacterial canker. It is not one of the more common tomato diseases that we see in vegetable beds like early blight. I believe this disease came with the transplants when you bought them. If you grew your own transplants, then the seed was contaminated or the beds where they are grown were not thoroughly clean when you planted.

Another possibility is that tomatoes were grown in that location in previous years. When you continue to grow the same vegetables in the same areas year after year, diseases tend to build up in the soil and it's difficult to grow plants in that location Of the same family. This is why it is important to rotate vegetables into new locations every year. Do not grow anything in the tomato family in that spot for the next 3 to 5 years. You can grow vegetables in different families there such as the cucumber family, onion family, carrots, beets but not tomatoes, peppers, eggplant or potatoes. They are all in the tomato family.

If the tomato plants are still alive, I would cut them back and remove about one third to half of the entire canopy of the plants. Don't give them a butch haircut but try to remove one entire stem where two come together. You want to open the canopy of the plant for air movement but you don't want to open it too much and cause sunburn. It will be a little tricky. Once you do that, lightly fertilize them and deep water them. If you prune them correctly, you should start to see new growth coming lower on the stems. Protect this new growth.

Diseases can be moved around on tools, your hands, clothing so make sure that everything is sanitized with 70% ethyl alcohol. Be sure that no debris, no rotting fruit, no plant parts, no weeds are present in the area.

Otherwise, pull these plants out and get them out of the garden area. Sanitize all your tools. Cleanup all debris in the garden. Replant with tomato seedlings in mid July to August 1. Or start some tomato plants directly from seed yourself in mid-July for a fall crop. Tomatoes will start setting fruit again when temperatures drop below 95 ° F consistently.

Laying Bermudagrass Sod

Q. When it comes to freshly laid hybrid Bermuda, does it make sense to water 
two or three times on hot days, in that the roots presumably having grown 
into the soil, thus you need to keep tin amount of soil moist, coming from 
the sod farm.
Commercially sod can be laid in large rolls, similar to carpet rolls.

A. Some of the hybrid bermudagrasses make the best lawns in the world. But they need more maintenance than fescue. They can handle alot of abuse during establishment. You should get it established in two to three months during the summer. It just needs water and nitrogen fertilizer applied regularly.

Freshly laid bermudagrass needs watering only once a day. But when you water it, water it thoroughly. Bermudagrass is warm season, subtropical, while fescue is temperate and a totally different "animal". Make sure enough water is applied to wet the soil 8 to 10 inches and apply nitrogen once a month. Don’t apply the water lightly and wet only the sod.

Not true of tall fescue sod. I would not lay tall fescue sod in this heat. Bermuda, yes.
Hopefully you put down a high phosphorus fertilizer before laying the sod. If you did not, then apply one now. Use 16-20-0 at a rate of 2 to 3 lbs of fertilizer per 1000 square feet and water it in immediately and thoroughly. At this rate it won't burn during the heat. Otherwise apply 21-0-0 at 3 lbs per 1000 every 4 to 6 weeks during establishment. Be ready to mow this sod twice a week with this watering and fertilizing regime. Depending on the Bermuda used, you can use a rotary mower on many of them. Otherwise it should be a reel-type mower.

Once established in about three months then cut back to normal fertilizer applications of three to four times per growing season.


Monday, June 26, 2017

Home Irrigation Primer - Help!

Q. Some advice on watering please. This is my first Las Vegas summer in a new to us house about 12 years old. Lots of lantana, Texas rangers, bottle brush, small short palms and other desert shrubs.  Everything is on a drip systems, no lawn.  I am not sure how often, how long to water.  How many days, once or twice a day, how long each time. My drip are adjustable.

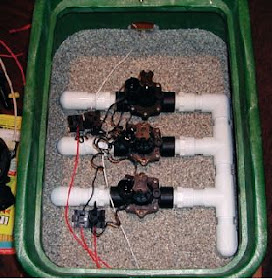
Valve box with valves
A. There are 3 things you need to know to use any irrigation clock or controller; the time of day to water, the days during the week to water and the number of minutes to enter for each station or valve. 

Irrigation controller or timer. Three pieces of information are entered: days of the week on or off, how many minutes to run each valve and the time they begin.
Most drip irrigation systems are a mess because the person who installed them didn't know what they were doing or, if they did, they have been altered over the years by landscape maintenance companies or the owner. You have what you have... unless you are willing to go in and totally redo the system ....which most people aren't.
 
Each colored wire connects to a separate valve. The white one is "common" to each valve as well.
Your irrigation clock requires you to set each irrigation valve separately. Your irrigation system might have lots of different plants on the same irrigation valve. That's very common. If that's the case, you have to find a happy medium for everything on that valve or redo the irrigation system. Most plants are quite adaptable to an irrigation schedule. The biggest plant problems occur when homeowners water daily on everything either because they are lazy or nothing seems to work for them.
 
Irrigation emitters, drippers, should be distributed under the canopy of a plant to supply their roots with water. Lots of emitters are needed to keep large trees upright so they don't fall over.
Time of day. If any part of your irrigation system sprays or "sprinkles" water into the air where the wind can move it around, this should be set for early in the morning and end by sunrise. If it's drip irrigation, it can be done anytime but is usually best if it comes on during the day as it is getting warm and, if a 2nd irrigation is needed that day, to come on late in the afternoon or early evening.


Days of the week. The days of the week depends on how shallow or deep the roots of plants are growing.


Shallow rooted: lawns, vegetables, annual flowers. Daily when it's hot. Vegetables and annual flowers might require a 2nd irrigation later in the day on days it's really hot and windy. Lawns should never require a 2nd irrigation on the same day. If they do, then they should be aerated with a lawn aerator and encouraged to grow their roots deeper.
 
Gasoline driven core aerifier
Rooted to a medium depth: woody shrubs up to 3 to 4 feet tall, woody vines and woody groundcovers. Examples might include roses, lantana, mock orange, etc. Every other day to every 3rd day when it is hot. When it is really hot you might have to irrigate every other day but try to avoid watering daily if possible. Under some circumstances, you might find it necessary.

Deep rooted trees and shrubs: These are trees and large shrubs that provide shade or beauty. Whenever possible, trees and shrubs that originate from desert climates should be on a separate valve. This almost never happens. Examples include Mulberry, Olive, ash trees, Purple leaf Plum, Fruit trees, etc. Once or twice a week during the heat of the summer. In some cases, 3 times a week. When fruit trees are producing fruit they should not be water stressed and require an extra irrigation per week when fruit is being produced. Most landscape trees and shrubs can be water stressed a little bit between irrigations.

Desert trees and shrubs: In an ideal world these should be on a separate irrigation valve but that may happen one out of every 20,000 homes. Examples include Palo Verde, Mesquite, Texas rangers, Texas ebony, cacti but usually not most succulents like aloe and the like. These plans can be irrigated less often than non-desert plants. The volume of water applied to them may be the same as above but more days between irrigations. During the summer they might be irrigated once every 7 to 10 days for instance.

How many minutes for each station = valve. Somehow you have to translate minutes to a volume of water. Also, the volume of water delivered to each plant is dictated by the number and size (gallons per hour) of the drip emitters. 

Here are some general guidelines.
1. Each plant should have a minimum of 2 drip emitters in case one of them fails.
2. Larger plants require more drip emitters. The smallest plants require two drip emitters. Medium-sized plants require four drip emitters. Larger plants/shrubs require 6 - 8 drip emitters. Trees may require 10 – 20 or more drip emitters depending on their size. If other plants are planted close to trees, under their canopy, the trees will require fewer drip emitters because trees are "drinking" from these other emitters.
3. Wet at least half of the area under the canopy of trees and shrubs.
The number of minutes should be enough for water to penetrate at least 18 inches deep in the soil next to the emitters used for large trees and shrubs.  For small and medium shrubs, vines and groundcoveres, 12 inches is deep enough.

Remember there are two types of overwatering: watering too often and watering using too many minutes. It is far worse to overwater the first way than the second.

Leaves Cupping on Pistache Tree

Q. I planted this Red Push pistache in the fall and it has put out a lot of new growth this year. My concern is that the leaves are curling. Would you advise me on this?

Red Push pistache planted and staked
A.  Your tree looks very healthy and green. I would not worry about it much at all. A close look at the leaves shows there is some minor scorching along the edges of the leaves. Scorching on the leaf edges when the leaves are first coming out is enough to cause these leaves to begin to roll or curl as you call it. Leaf edges are damaged but the rest of the leaf continues to grow causing it to roll.

Be careful not to water too often. It's okay to water daily for the first week or 2 but after this you should not be watering daily. When this tree was planted the soil should've been thoroughly flushed with water. 
Leaves cupping because the edges were damaged when young but undamaged center continued to expand

If this has not been done, do it now by putting a hose with a sprinkler on the end of it with a very low volume of water coming out and flood that area under the tree for several hours. This helps flush any salts out of the soil in the area of the planting hole. When the tree was planted a hose should've been used to fill the hole as the roots of the tree was being backfilled with soil.

A tree of this size might require at least 4 drip emitters located about 18 inches from the trunk. You must water the soil in the planted area. A tree this size might require 10 to 15 gallons each time you irrigate. Next year it might require 15 to 20 if it puts on some good size. Next year, add 2 more drip emitters if you are only using four now.


I Hate Resolving Disagreements

Q. Please settle a disagreement between my wife and me. Each spring my wife plants several plants in pots for our patio using bagged potting soil. Each year a few of them die and others live. This happened two years in a row. I contend the potting soils need to have some real dirt mixed in with it to make them better.
 
Most potting soils throw in some perlite for looks. The amount is too small to do much but it looks good!
A. I hate to get in the middle of arguments between a husband and a wife. I think I can say diplomatically you are both right. Bags of potting or container soils are pretty much all the same when comparing those in the same price range.
Commercial potting soil. No perlite but better than some of the bagged stuff.
            You get what you pay for. Higher priced potting soils, like those from Fox Farm, use a higher percentage of more expensive ingredients. These potting soils cost more but they are superior compared to less expensive brands.
            If you use inexpensive potting soil then add a high-quality compost to it. Add about 15 to 25% by volume. Adding your own compost helps inexpensive potting soils perform a lot better.

Flatheaded Borer Does Get Into Palo Verde

Q. The branches of my Palo Verde are turning brown and dying. I have lost one tree and looks 
like two others will die as well.  They are 25 years old.

A. It is difficult to diagnose without more information. If branches are dying in Palo Verde during the heat, my mind instantly goes towards borers. The Palo Verde borer that feeds on the roots is a possibility.
Flatheaded Borer in palo verde limbs due to sunburn. Pruning too much can cause severe sunburn on the branches.
            It is possible it could be other borers in the tree, such as some of the flat headed borers, but individual branches dying is frequently associated with borers of some sort. If you think borers might be the problem, apply a soil drench insecticide around the base of the tree and water it in.
Flatheaded borer in palo verde. Be careful when you prune.
            It is also possible to be water related such as keeping the soil around roots too wet. If the irrigation has been changed recently or there was an irrigation problem, too much water might be the culprit. Desert trees like Palo Verde perform very well when there is more time between irrigations compared to landscape trees like ash or even Chitalpa.
            It could be pruning related. If trees were recently pruned hard this past winter or spring, there is a possibility of sunburn damage to the limbs. The limbs would be discolored or brown on the top surface facing the sunlight. Sunburn damage frequently attracts boring insects.
            Make sure the tree is watered deeply but infrequently. Water applied to the soil should wet most of the area under the tree, not just close to the trunk. This water should drain into the soil 18 inches or more.Hopefully it will heal on its own. Be careful of pruning.
            Wet soil is soft. Dry soil is hard. Use a long screwdriver or 3/8-inch rebar poked in the soil to determine how deep the water has moved into the soil after the irrigation.
            This tree should not require an irrigation for a week if it’s watered deeply. When the soil around the roots becomes dry, this tree will start dropping its leaves. This is your signal it’s time to water again.

Most Lavenders Work Well in the Desert

Q. What lavender would be best for making a hedge? I just bought a home and heard lavender is a natural repellent for scorpions and other insects. I'm trying to tackle my pest problems and landscaping renovation at the same time. 
 
'Spanish Eyes' fernleaf lavender in a five gallon container in East exposure
A. I think your selection will be restricted more by what is available locally. Stay away from English lavender in hot locations. English lavender would be better planted in the north or east sides in some light shade. Spanish and French lavender are generally more tolerant of the heat.
            I am not sure what local nurseries are selling but lavender has been planted in our climate without any difficulties. It is fine in full sun but it may struggle in very hot locations such as against walls west or south facing. These plants will appreciate amending the soil at planting time.

Rock mulch is never a good idea with lavender. Amend the soil with compost at planting time and cover the surface of the soil with woodchip mulch. You might look for Rosemary and neem oils as a spray deterrent for bugs as well.

Follow Me on My New Twitter

Why Twitter?

Twitter gives you real time information about what is happening NOW.  Learn what people are asking now or what pests they are seeing. Stay on top of what is happening.

Isn't following Xtremehorticulture blog enough?

Yes, if you don't need to know what's going on in real time. By signing up to receive my tweets you will get alerts when I post something new. Your email address is not shared with ANYONE!

I post on two twitter accounts; 

@Xtremehort for real time gardening information

and

@Viragrow, for a focus on compost, soils, soil mixes, mulch and fertilizers.

Tweets include:
  • real time alerts of local pests
  • news about the organic movement and local food
  • questions sent to me with pictures

How to get these tweets?

In your browser type in @Xtremehort and follow the directions! Same with @Viragrow


Orchids in the Desert? No Problem.

Q. I've a small collection of Cymbidiums, Cattleyas, Phalaenopsis orchids and staghorn fern plants. I am moving from California to Henderson. Will I have any luck in continuing to grow them after I move? What kind of different care will I need?  
Orchids at our farm in the Philippines
A. I have grown easy to grow orchids like Phalaenopsis and Cymbidium without any problems in the open air here in the Mojave Desert. We have them on or farm in the Philippines but that's cheating. I have even kept them in an open atrium without extra humidity in Las Vegas during the winter without problems. I just keep an eye on the temperature and the sunlight. It is surprising the temperature and humidity extremes they can handle. Orchids in the Philippines kind of suffer through the dry season until rains come beginning in July.
Tiger orchid
            Staghorn fern is going to be different. Unlike orchids, they don’t require a lot of light. But they will begin to look ragged if you don’t provide them with extra humidity. Staghorn, as well as birdsnest ferns, will be difficult to keep looking good without some control over humidity. You might consider a humidifier in the room where you keep plants more sensitive to humidity.
Angel orchid
            Use distilled water spiked with a small amount of fertilizer when you water. Check the salinity of your irrigation water and keep the salinity below an EC of 2.0 mmhos/cm (dS/m) when you water any houseplants.
            Our tapwater coming from the Colorado River has high salt levels that could damage sensitive plants if they are watered with it regularly. Never mist them with it. Likewise, it’s not good to water plants with straight distilled or RO water.
            There is a local group of orchid growers that you could reach out to called the Greater Las Vegas Area Orchid Society. They can be found on the Internet at http://www.glvos.org/

Cana Lily Care in the Desert

Q. What is the proper care for Canna lilies. Since they are a dominant plant in my landscaping here in Palm Springs, I'd like to know what to fertilize them with, when to fertilize, when to cut back, when to water, how much and in which season, etc. I read your information on deadheading and that was useful.
Tropicanna is the most popular canna lily of all time. Its colorful siblings are equally spectacular and all three deserve a spot in your garden.
Take a look at Canna lilies on Pinterest https://www.pinterest.com/pin/14144186308774982/
A. I like Canna Lily as well. There are many types to pick from; different heights, flower color, leaf color, leaf variegation. One thing is for sure; these plants love lots of organics in the soil and plenty of water. They grow even in fish ponds!
            Plant them in a high, water use areas of the landscape together with other plants that like lots of water. They can take full sun as long as they get plenty of water and great soil. Make sure their soil is amended with lots of compost at planting time. They love the surface of the soil surrounding them covered with woodchip mulch, not rock mulch.
            If they are growing well and robustly, they need to be dug up and divided every 3 to 4 years. Do this at the same time as you would iris; when it cools off in the fall or very early spring. Fall is best. Divide them at this time, wait a few days to heal and replant them.
            Deadheading is always important for looks and continual blooming. Fertilize them 3 or 4 times during the year with a rose type fertilizer; very early spring when new growth is pushing, lightly during the summer months at about half rate, late summer when it begins to cool and once more around Halloween.
            To help you remember it think of Labor Day, Fourth of July (half rate), Memorial Day and Halloween. To get vibrant Cannas, substitute compost instead of fertilizer for the first or last application of the year.
            Cut them back to the ground after they freeze in December or just before new growth if they don’t freeze.

Viburnum Leaf Browning Probably NOT Spider Mites


What’s happening to my Spring Bouquet (Viburnum Tinus)?  It bloomed beautifully in the Spring for several years (including this past Spring), but many of the leaves are turning brown, and appear to be burnt.  I didn’t see any evidence of spider mites or other pests.  I checked the drippers and it is getting sufficient water.  Is this damage caused by Fire Blight, Spider Mites, or something else?  I was planning to spray it with Bayer 3 in 1 Insect, Disease, & Mite Control (which contains Imidacloprid, Tau-fuvalinate &Tebuconazole). .

Any assistance would be appreciated.


A. You are correct to inspector for spider mites this time of year. We usually see them when weather has been hot and dry. Spider mites can be a problem even if we don't see webbing. Webbing isn't always present. Spider mites love dusty leaves so washing the leaves off with water after windy weather is a good idea.
 
Two spotted spider mite. Actutally the size of this period......
That being said, I don't see spider mites as a problem in the pictures you sent to me. Spider mites don't live very long so their dead bodies leave behind kind of a dusty appearance to the leaves. I also use a hand lens and look for their tiny eggs which are round translucent balls. Finally I take a branch and slap it against a white piece of paper. I look for tiny crawly things about the size of the period at the end of the sentence.
 
This is spider mite webbing but doesn't always happen
I don't think you have them. I think this problem is water related. Either the plants are watered too often, they are not given enough water when they are watered or they are given too much water. You didn't tell me how often you water but I think you are may be watering too often. That's my guess. Root suffocation or rot is relatively common on viburnum unfortunately.

Water less often.  When you water, give them a lot Of water at one time and then hold off until they need it again. Never water these every day. At the very least you should be able to water them every other day. Maybe even every 3rd day.

Increase the number and size of the emitters. The easiest way to Give them more water is to increase the number of emitters and the size of these emitters to this plant. For example, if this plant has 2 emitters Watering it, increase it to 4 emitters. If this plant has 2 gallon per hour emitters, change them to 4 gallon per hour emitters.

it is better to give them too much water all at once and then wait than it is to water them every day.

Improve drainage. Soils that have little amendment in them to improve the drainage get worse over time. This is because the organics in the soil decomposes and disappears. This causes the soil's to collapse and drain poorly. This causes poor drainage and leaves water around the roots and suffocates them.

Get a 1 inch diameter or larger auger that can attach to a drill. Make sure this auger is at least 18 inches long. Drill 8 to 10 of these holes within 12 inches of this plant without hitting your irrigation lines. Leave these holes open and drill more of them when they collapse or fill them with compost to help keep them open. You are creating a French drain or a sump, sometimes called vertical mulching. This helps move water away from the roots that might be suffocating them.

Replace the rock mulch with wood chips. Wood chip mulch on the surface of the soil decomposes and improves the surface layer of the soil. Rock mulch doesn't. It actually makes the soil worse for drainage.