Saturday, July 7, 2018
Thursday, July 5, 2018
Apricot and Apple Tree Growing Poorly
Q. My apple and apricot
trees have small leaves and not much new growth. The few dark green leaves are almost
dead. I fertilized the plant in the prescribed periods and watered the plant as
in previous years. The apple tree made flowers but few fruits. The apricot had lots
of apricots and dropped some earlier but few green leaves.
 |
| Apricot tree sparse and not filling in properly. Having a tree with the canopy this open can lead to borer problems if it doesn't already have them. |
 |
| Apple tree is sparse. The same thing applies to Apple trees. They need enough water and a big enough basin to water the roots, nutrients which we supply through rich compost or fertilizers, and a surface mulch which decomposes to enrich the soil. |
A. Thanks for the
pictures. I think the problems are a combination of water, fertilizer and soil.
As you know, the trees should be thick and dense this time of year. They are
not because, I think, they lack these three ingredients.
Water
Your trees are about 8 to 10 feet tall and would need
about 20 to 30 gallons of water every other day during the hot summer months. As trees get
older and larger, they need more water. That works out to about 75 to 100
gallons each week.
There is a basin at the bottom of the tree that is maybe
3 feet in diameter. Increase the size of that basin to about 6 feet in diameter
or 3 feet from the trunk in all directions. That will accommodate more water
and spread it about a foot beyond the basin.
Compost or fertilizer
Spread about 1 cubic foot of good quality compost in the
basin away from the trunk before you water it again. This compost should have a
high nutrient content such as Viragrow’s. Many do not.
After rebuilding the basin in a six-foot diameter around
the tree and applying compost, fill the basin with a hose or sprinkler on the
end of a hose. Fill the basin twice.
Mulch
Cover the soil in the basin with woodchips from local
trees if you can find them. If you can’t find any, use straw 4 to 6 inches deep
until you can find some woodchips.
Increase the amount of water to the tree by covering that
soil with about one – two inches of water flooding the basin. Water the tree
three – four times per week using this basin and flooding technique. You should
see new growth starting in about 7 to 10 days.
Design and Installing Lawn Irrigation Not As Easy As It Looks
Q. We installed a lawn 18
months ago, but it has a difficult time during summer months. I aerate it,
fertilize it and I know the drainage is good because the landscaper installed
the system to our HOA requirements. I water twice daily, six days a week around
5 AM and 9 PM. There is a decent amount of shade and the yard faces south. Even
the heavily shaded areas have problems. What can I do differently?

 |
| Brown patches in lawns during hot summers will quickly show irrigation weaknesses. Notice these patches are also close to the patio where people walk. This area should probably be core aerified annually due to traffic. |
A. I looked at your
pictures and the lawn looks good in most places except for a few small brown areas.
Brown spots during summer months frequently point out weaknesses in the
irrigation system. In your case the brown spots are also in front of the patio where there is alot of human traffic. Areas like this should be core aerified annually.
Hollow tine aerifier
Hollow tine aerifier
My first suspicion is the irrigation system and was not
installed or maintained properly. Let’s cover the basic “must dos” when
installing and maintaining an irrigation system.
Water pressure
The operating water pressure MUST be within the operating range of the sprinkler nozzles. Frequently this is 15– 30 psi. Some expensive sprinkler heads have built in pressure regulators, but lesser expensive ones may not. If the water pressure is too high, fogging or misting will occur out of the nozzle. If the sprinkler head is “fogging”, then brown spots will occur in weak areas. If pressure is too high, reduce it with a pressure regulator. If water pressure is too low, remove any pressure regulator, change it for the proper one or install a booster pump to increase the water pressure.Head to head coverage
Water must be thrown from the nozzle far enough to reach neighboring sprinkler heads. Sprinkler heads must be installed at distances specified by the nozzles. These distances are meaningless if you don’t have the right water pressure.Sprinkler nozzles
Sprinkler nozzles specify the operating pressure range, allowable spacing between sprinkler heads and precipitation rate in inches per hour among other things. These nozzles must be matched to each other. If someone maintains the irrigation system and replaces a nozzle with the wrong kind, it will produce brown spots in underwatered, weak areas.
Curved areas and re-curved areas of the lawn are the most
difficult to water. There are adjustable nozzles that can be used but it will
always be a weak irrigation area subject to brown spots.
- Never water early at night like at 9 PM. If your lawn is healthy and it has a good irrigation system, one irrigation per day during summer is all that most lawns need IF the sprinkler system was designed and installed correctly. Irrigation should finish just before dawn. If you must water late in the day, apply water so that the grass leaf blades dry before it gets dark.
- Don’t rake or catch the grass clippings when mowing. Most mowers now are “mulching mowers” with a special blade and deck design. Returning the clippings to the lawn substitutes for one fertilizer application each season.
Sap Is Oozing from My Kumquat Limbs
Q. Unfortunately it
appears our kumquat trees may have bacterial blast fungus. Our tree appears
very healthy and has given us a lot of fruit, but we recently noticed sap
coming from the bottom of main branches. What treatment would you recommend?


 |
| Sam is oozing from the limbs of this kumquat.It sounds crazy but disease stress from management issues can cause sap oozing like this to appear. The KISS rule tells me to look at the soil and watering issues first. |
A. I usually follow the
KISS rules for diagnosing plant problems. Unless we are in a citrus production
area, or there is a history of disease on these trees, I first conclude it's a
man-made problem. Regardless, we must rule out the simplest reasons first
before we jump to more exotic disease problems.
Root death because soils are kept too wet cause these symptoms
on citrus. For this reason, I assume the trees watered too often or there is a
water drainage problem in the soil surrounding the roots.
Simple test if watering too often issues
After the first year of growth, all fruit trees,
including citrus, should be rooted firmly in the soil. A simple diagnostic tool
helps judge whether wet soils should be a concern or not. Move the tree by its
trunk, back and forth, while looking at where the tree enters the soil. The
tree should be firmly anchored in the soil and not move it. If tree roots move
the soil easily, then the soil has probably been kept too wet and the roots
began “drowning” or rotting.
There is a tendency during hot weather to water fruit
trees more often, even daily. Most fruit trees, including citrus, prefer at
least one day of no watering between watering days. Unless the tree is newly
planted, or planted in sand, never water trees daily. Instead, increase the
minutes on the clock when you do water.
Mulch can add one extra day between irrigations
Anything that shades the surface of the soil during
summer helps tree roots function better. Their primary functions regarding tree
health are the uptake of minerals and water. They do this better, however, if
the surface of the soil is mulched. Woodchips (or even shredded cardboard, shredded
newspaper or straw) lying on the soil surface gives fruit trees one extra day
between waterings during the summer.
If the soil is not mulched or covered, soils dry quickly
and get hot in our summer sun and heat. When soils are wet, tree roots grow where
there is a good mix of air and water. Unless the soil has been amended quite a
distance from the tree at the time of planting, most of the tiny roots that
feed on water and nutrients grow in the top 6 inches of soil.
Yellow Bird of Paradise Growing Poorly
Q. I've planted a Mexican
Bird of Paradise about three years ago. It has never flowered and has only
grown a small amount in that period. Any ideas why? Could it be its location?
It doesn't get morning sun, only afternoon sun.
 |
| Bird of paradise lack of growth probably because of water, soil amendments and fertilizer. |
A. Thanks for sending
pictures. I must be a little careful because watering too often and not giving
the plant enough water can create similar results. Afternoon sun should be
enough for this plant. Make sure it’s not near a “hot” wall from the afternoon
sun.
Notice how the plant has more foliage, or “leafy growth”
because of the suckers, at the bottom? The stems growing above the suckers are
nearly void of leaves. That is usually a sign the plant is not getting enough
water at each irrigation. It can also indicate the plant doesn’t have much nitrogen
fertilizer for growth.
I must be careful because we are considering two things;
how much water the plant is getting and how often it gets it. I would recommend
watering this plant with about five gallons or more at each watering. Water it
three times a week during the summer. Use two drip emitters within six to 12 inches
of the base on either side of the plant.
These are “desert
plants” but they also can grow in wet landscapes if there is drainage. They
grow best in improved and amended soils. If this was planted directly in your
landscape soil without soil amendments like compost, or an inferior amendment
was used at planting, then it could struggle as well. Apply a good compost
within about 12 inches of the plant in a circle and water it in. Use about ¼
bag each plant.Pull rock away from the base of the plant until it gets firmly established and you see plenty of new growth.
Heavy Metal Content in Tomatoes Grown in Soils with Biosolids
HEAVY METAL NUTRIENTS IN TOMATO PLANTS CULTIVATED IN SOIL AMENDED WITH BIOSOLID COMPOSTS1 |
| Authors: | W.J. Melo, A.A.D. Cintra, M.D. Revoredo, L.T. Braz | |
| Keywords: | Lycopersicon esculentum Mill., Cu, Mn, Zn, composting process, waste | |
| DOI: | 10.17660/ActaHortic.2003.627.26 | |
Abstract: The use of biosolids in horticulture could contribute to recycle residues produced by men. This study analyzed concentrations of Cu, Mn and Zn in the compost during fermentation, in the soil amended with the composts and in the tomato plant materials. Five composts were produced using sugar-cane bagasse, biosolid and cattle manure in the proportions: 75-0-25; 75-12.5-12.5; 75-25-0; 50-50-0 and 0-100-0 (composts with 0; 12.5; 25; 50 and 100% biosolid), respectively. These composts were used in an experiment with 6 treatments (the 5 composts and a control with mineral fertilization) in a design of randomized blocks with a split plot design. The control and the treatment of 0% biosolid received inorganic nitrogen. All the treatments received the same amount of N, P and K. Two tomato plants were cultivated in each 24 L pot, in a greenhouse at the Technology Department of the Faculdade de Ciências Agrárias e Veterinárias of the Universidade Estadual Paulista in Jaboticabal County, São Paulo State, Brazil. The concentrations of Cu, Mn and Zn were evaluated in the compost 7, 27, 57, 97 and 127 days after composting began, in the soil 0 and 164 days after the compost applied, and in the plants. Compost, soil and plant samples were subjected to digestion with HNO3, H2O2 and HCl and the metals were determined by AAS. There were positive and significant correlations between Mn in the compost and Mn uptake by the plant (0.46 p>0.05), and between Zn in the compost and Zn concentration in the plant (0.78 p>0.05). Cu, Mn and Zn concentrations increased during composting. The biosolid in the compost supplied Cu and Zn to tomato plants, and the cattle manure supplied Mn to the plants. Note:
| ||
Viragrow: Biosolids Compost as Component of Potting Media fo...
Viragrow: Biosolids Compost as Component of Potting Media fo...: Biosolids Compost as Component of Potting Media for Bedding Plants Authors Marta S. Zubillaga and Raul S. Lavado Summary Soilless ...
Use of Tree Spikes to Climb Palms or Not?
Q. I have Mexican fan palm
trees that were skinned a few years ago. I just had them trimmed. The trimmer climbed the trees with spikes.
The spikes left holes in the trees. Will this harm them?
A. Most likely not but
using tree spikes or “gaffs” is not a good idea. The holes created by climbing
gaffs create places for diseases to enter the tree. One disease, a lethal
disease for Canary island and Mexican fan palms called Fusarium Wilt, can enter
the tree through these wounds. This can be particularly true if the gaffs were
used first to climb a tree that was infected.
This disease and others can also be transmitted from tree
to tree on pruning equipment if this equipment is not cleaned and sanitized
properly between trees. Several methods can be used to sanitize pruning
equipment including alcohol, Pine-Sol, TSP or trisodium phosphate, and even 30
seconds of direct heat from a butane lighter.
There isn’t a good reason to NOT clean and sanitize
pruning equipment. It’s laziness. Would you go into surgery and let the doctor
use a dirty scalpel? If climbing gaffs must be used, at least sharpen, clean and
sanitize them before climbing.
I can understand why you might be upset having holes
punched into “skinned” palms. Avoid putting holes in the trunk whether it’s
pounding nails, pruning with a chainsaw or climbing with gaffs. Climbing gear
that create holes are no longer recommended for pruning palms. Taking a gentler
approach is preferred. Ladders, “cherry pickers” or scissor lifts are recommended.
Favorable Growth of Trees in Soils Amended with Compost
Effect of organic amendment for the construction of favourable urban soils for tree growth
SUMMARY
L. Vidal-Beaudet1,4, G. Galopin2 and C. Grosbellet3
1 Agrocampus Ouest, Centre d’Angers, Unité de Recherche EPHor, Angers, France
2 Agrocampus Ouest, Centre d’Angers, UMR IRHS, Angers, France
3 Florentaise, Le Grand Pâtis, Saint Mars du Désert, France
4 IRSTV-FR CNRS 2488, Ecole Centrale de Nantes, Nantes, France
1 Agrocampus Ouest, Centre d’Angers, Unité de Recherche EPHor, Angers, France
2 Agrocampus Ouest, Centre d’Angers, UMR IRHS, Angers, France
3 Florentaise, Le Grand Pâtis, Saint Mars du Désert, France
4 IRSTV-FR CNRS 2488, Ecole Centrale de Nantes, Nantes, France
SUMMARY
Ornamental tree planting and establishment in cities is a great challenge because urban soil physical properties are unfavourable to the development of root systems. Our objectives were to measure (i) the effects of organic matter on soil physical properties and tree development, and (ii) the effects of ensuing root development on soil physical properties. Using twenty-four 600-L planted or bare soil containers, we monitored physical properties such as dry bulk density, aggregate stability and near-saturated hydraulic conductivity of our reconstituted soils over a 5.5-year period. A 28-cm thick top layer of sandy loam amended with 40% (v/v) sphagnumpeat or organic composts was laid on top of a 28-cm thick layer of sandy loam. Bare-root Ostrya carpinifolia trees were planted in half of the 24 containers, and we monitored shoot development and root biomass and distribution. After 5.5 years, trunk diameter had increased from 59 mm for the control soil to 66 mm for soil mixed with green waste compost, and 74 mm for soil mixed with co-compost of sewage sludge and wood chips. After 4.5 years, trunk diameter was strongly correlated with the total number of axes (r=0.94) and fine root length density (r=0.98), and was confirmed as a good indicator of tree development. Fine root development increased stable aggregate formation in all treatments as compared to bare soil. After 4.5 years after planting, the tree root system induced by a high organic matter input had significantly improved near-saturated hydraulic conductivity and was fit to support fertile urban soils.
Keywords aggregation, artificial soil, compost, Ostrya carpinifolia, tree development, urban horticulture
Significance of this study
What is already known on this subject?
- The quality of the constructed soil used for backfilling the tree pit plays a major role in tree performance. Soil organic matter content also plays a key role in agronomic fertility, so the use of organic amendments and especially composts appears as an ideal solution to boost urban tree growth.
What are the new findings?
- The addition of high levels of organic composts immediately improved the soil physical properties (e.g., dry bulk density, aggregate stability and hydraulic conductivity) and in return fine tree roots modified soil structure and decreased dry bulk density in the top layer. Correlation coefficients confirmed trunk diameter as a very good indicator of tree above and belowground architecture.
What is the expected impact on horticulture?
- Sustainable tree planting and establishment in cities is a great challenge for managers of urban tree resources. In these cases of urban horticulture, to decrease tree replacement frequency and ensuing costs, it is necessary to improve the establishment and maintenance of trees in cities. To develop urban horticulture, it is essential to educate all the city makers (landscape architects, civil engineers, urban planners, municipal officials and urban farmers) about optimal soil specifications expected for fertile urban soils: choice of organic matter nature, sources of organic matter or mineral material, proportions of organic matter in term of soil structuring and soil profile design.
Monday, July 2, 2018
Part of My New Ocotillo is Dying
Q. My Ocotillo appears to be dying. It was
planted this year and the left side has lost all its green leaves but the right
side looks perfectly okay. Do you have any ideas what happened?
When
roots begin rotting on one side of a plant, it can lead to dieback in the tops.
If leaves first came out and then died, it means water stopped getting to the
leaves because roots died. If roots are dead when it is planted, leaves may come
out and then die back or the entire plant can die.
Roots
can die after it has been planted or they can be dead at the time of planting. Partial
root death can be caused by poor storage and handling conditions at the
nursery. But the usual reason is because it is watered too often after planting.
A. Yes, I have seen it before. It is probably because
it is watered too often, the soil didn’t drain water fast enough and
consequently some roots rotted. Common problem with some desert adapted plants.
They don’t like soils that are kept wet.
 |
| A healthy ocotillo survives. |
 |
| Why is it sometimes ocotillo lives and sometimes dies? It is usually because of water. In some way, the problem is nearly always associated with water. |
Let’s
cover the basics of planting an ocotillo.
Dig the hole three times the size of its roots. Amend the soil with compost, about 50/50, and use this soil for planting. As you are planting, add water to the soil in the hole to settle it and remove air pockets.
Dig the hole three times the size of its roots. Amend the soil with compost, about 50/50, and use this soil for planting. As you are planting, add water to the soil in the hole to settle it and remove air pockets.
Cut
it loose. Ocotillo stems are tied together so they don’t get damaged when they
are in storage and transported. After planting, cut the stems loose and let
them spring outward.
Stake
it. Ocotillo has very small roots compared to its top. Grow enough roots so it
can support top growth. Frequently the plant will not stay upright after
planting because it is top heavy. Use rebar to stake the plant in three
locations to immobilize roots. Tie rebar tostems so that the roots can’t move. You
might have to leave it staked for over a year.
Water
it. Water it no more than once a week. At first, water near the base of plant
to supply the roots water. Use a 2 – foot diameter basin to hold the water near
the roots. As the plant shows signs of growth, apply water further from its
base. This encourages roots to grow outward, away from the base, and support
the top.
Don't plant it in a low spot. This is where water collects and will kill it. The soil must have good drainage and become dry after it is wet.
Don't plant it in a low spot. This is where water collects and will kill it. The soil must have good drainage and become dry after it is wet.
Some
people will spray the stems with water daily after planting. They claim it helps
establish the plant. There is no solid evidence to support this idea but it may
help.
Once
established, ocotillo should be watered more often than cacti but less often
than nondesert plants. Remember, they don’t like wet soils! They are a desert plant.
Watering daily would be a big mistake.
See
http://xtremehorticulture.blogspot.com/2012/04/planting-ocotillos-so-they-dont-die.html
http://xtremehorticulture.blogspot.com/2014/04/planting-and-watering-ocotillo.html
http://xtremehorticulture.blogspot.com/2014/08/ocotillo-two-years-and-not-green.html
http://xtremehorticulture.blogspot.com/2014/04/ocotillo-watering-should-be-infrequent.html
Bug Problem Confusion on Pomegranate
Q. I have a pomegranate
tree that bears fruit with dark red seeds. I have been fighting a bug that
turns the inside pale white, almost gray. I also have a big, slow flying bug
that sits on the fruit and puts its tail in it, splitting it for the birds. We also
have the Katydids which I didn't know were harmful until recently. I tried to
be as organic as possible.
 |
| leaffooted plant bug shot from reader. Not sure where it is.....? |
A. Thanks for the follow-up pictures to help me identify problems. The katydid is a problem on pomegranates in California but I had never heard of it reported as a problem here. The picture you sent to me is not a katydid but a green lacewing which is a “good guy”. Their young are probably after aphids or immature whiteflies.
 |
| Confusion of green lacewing with katydid by reader Katydid on pomegramate |
I did not get a picture of the second insect and I do not
know what it is. But be careful in identifying insects so you don’t confuse the
“good guys” with the “bad guys”.
The leaf footed plant bug is a perennial problem on pomegranates,
other fruit and nut trees and vegetables. Organic sprays such as soap and water
are effective when they are very young but not so when they are older such as
now. Control of these critters should start in about April.
Conventional pesticides like synthetic pyrethrins are the
only way I know of getting some control this time of year.
Whats Causing Leaf Damage on Creosote Bush
Q. Two creosote bushes in
my landscape have distorted leaves and very thin foliage. Both bushes receive light, supplemental water
and have for the past ten years. I noticed a Midge’s gall on each bush. Can you give me recommendations on bringing
them back to health?


A. It may be impossible to tell you exactly what caused these distorted leaves on your creosote bush but I put these types of problems into two categories; insects and environmental. I would rule out diseases.
Judging from the pictures, most of the leaf distortion
seems to be “cupping”. I see a few leaves with brown tips. I also saw in one
picture some very light “webbing” and leaf tip dieback which makes me suspicious
of spider mites.
 |
| Online reference to this article |
It’s a common misconception that native plants like
creosote bush don’t have pest problems. They do. Many of our native plants have
insects and other animals that coexist together. Some of them cause damage and
others feed on these bad guys. That, and limited new growth, keep them in check.
But, seldom does it get out of control.
When leaves cup, some part of the leaf becomes damaged as
it was growing. As the leaf continues to grow, the undamaged part of the leaf continues
to grow normally while the damaged part doesn’t. This causes the leaf to “cup”.
There are several native insects that already have a
relationship with creosote bush and have the potential to cause this kind of damage;
the Creosote Bush Stink Bug and the Creosote Bush Plant Bug. Both insects have
piercing sucking mouthparts and can cause this type of damage which gets hard
to find as leaves get bigger. Diseases can cause this type of damage, but
probably less likely.
Creosote Bush Stink Bug
Creosote Bush Plant Bug
Creosote Bush Stink Bug
Creosote Bush Plant Bug
If I follow the KISS principle when diagnosing problems.
My best guess is probably insects because of their abundance with this plant. Check
this plant for spider mites. Although they are not technically insects, they fall
into a general “insect” category of damage.
Spider mites are very tiny and hard to see. Take the stem
of a plant still attached and slap it hard against white paper. Look for
crawling dots the size of a period at the end of a sentence. If these tiny dots
are moving, then you’ve nailed it.
Brush your fingers across these dots and they will smear
on the paper. Because I'm curious, I also look, with a hand lens, for tiny
translucent balls on the leaves. These are their eggs. Plants oftentimes appear
extra dusty when they have spider mites because of all the dead spider mite
carcasses on the leaves.
I think the
succulence of this plant growing in a landscape was probably a huge magnet to
plant feeders like a spider mites and other “bugs” looking for food. Plants
like this with extra succulence are like a smorgasbord to plant feeders.
What to use? Washing the plant with a stream of water
helps to keep spider mites from getting established but once established they
are a continuous problem during hot weather. There is a lot of anecdotal
recommendations out there but most of them are untested in the field.
Soap and water sprays, if you do it two or three times a
week, will oftentimes get them under control. Make sure you spray the top side
and bottom side of leaves. But it doesn't do much about the insects with
piercing mouthparts. You've got to spray them directly with soap and water to
kill them. And it will kill them but it must be a direct hit. Some organic
sprays might work for you such as neem oil.
Traditional pesticides used for insects oftentimes make a
spider mite problems worse. Bad spider mites are usually kept under control by
good mites. Spraying a traditional pesticides to control mites will wipe them
both out. However, if it's really bad then go ahead and apply a miticide from
your local nursery or garden center. But first try to wash them off with a
stream of water and soap and water.
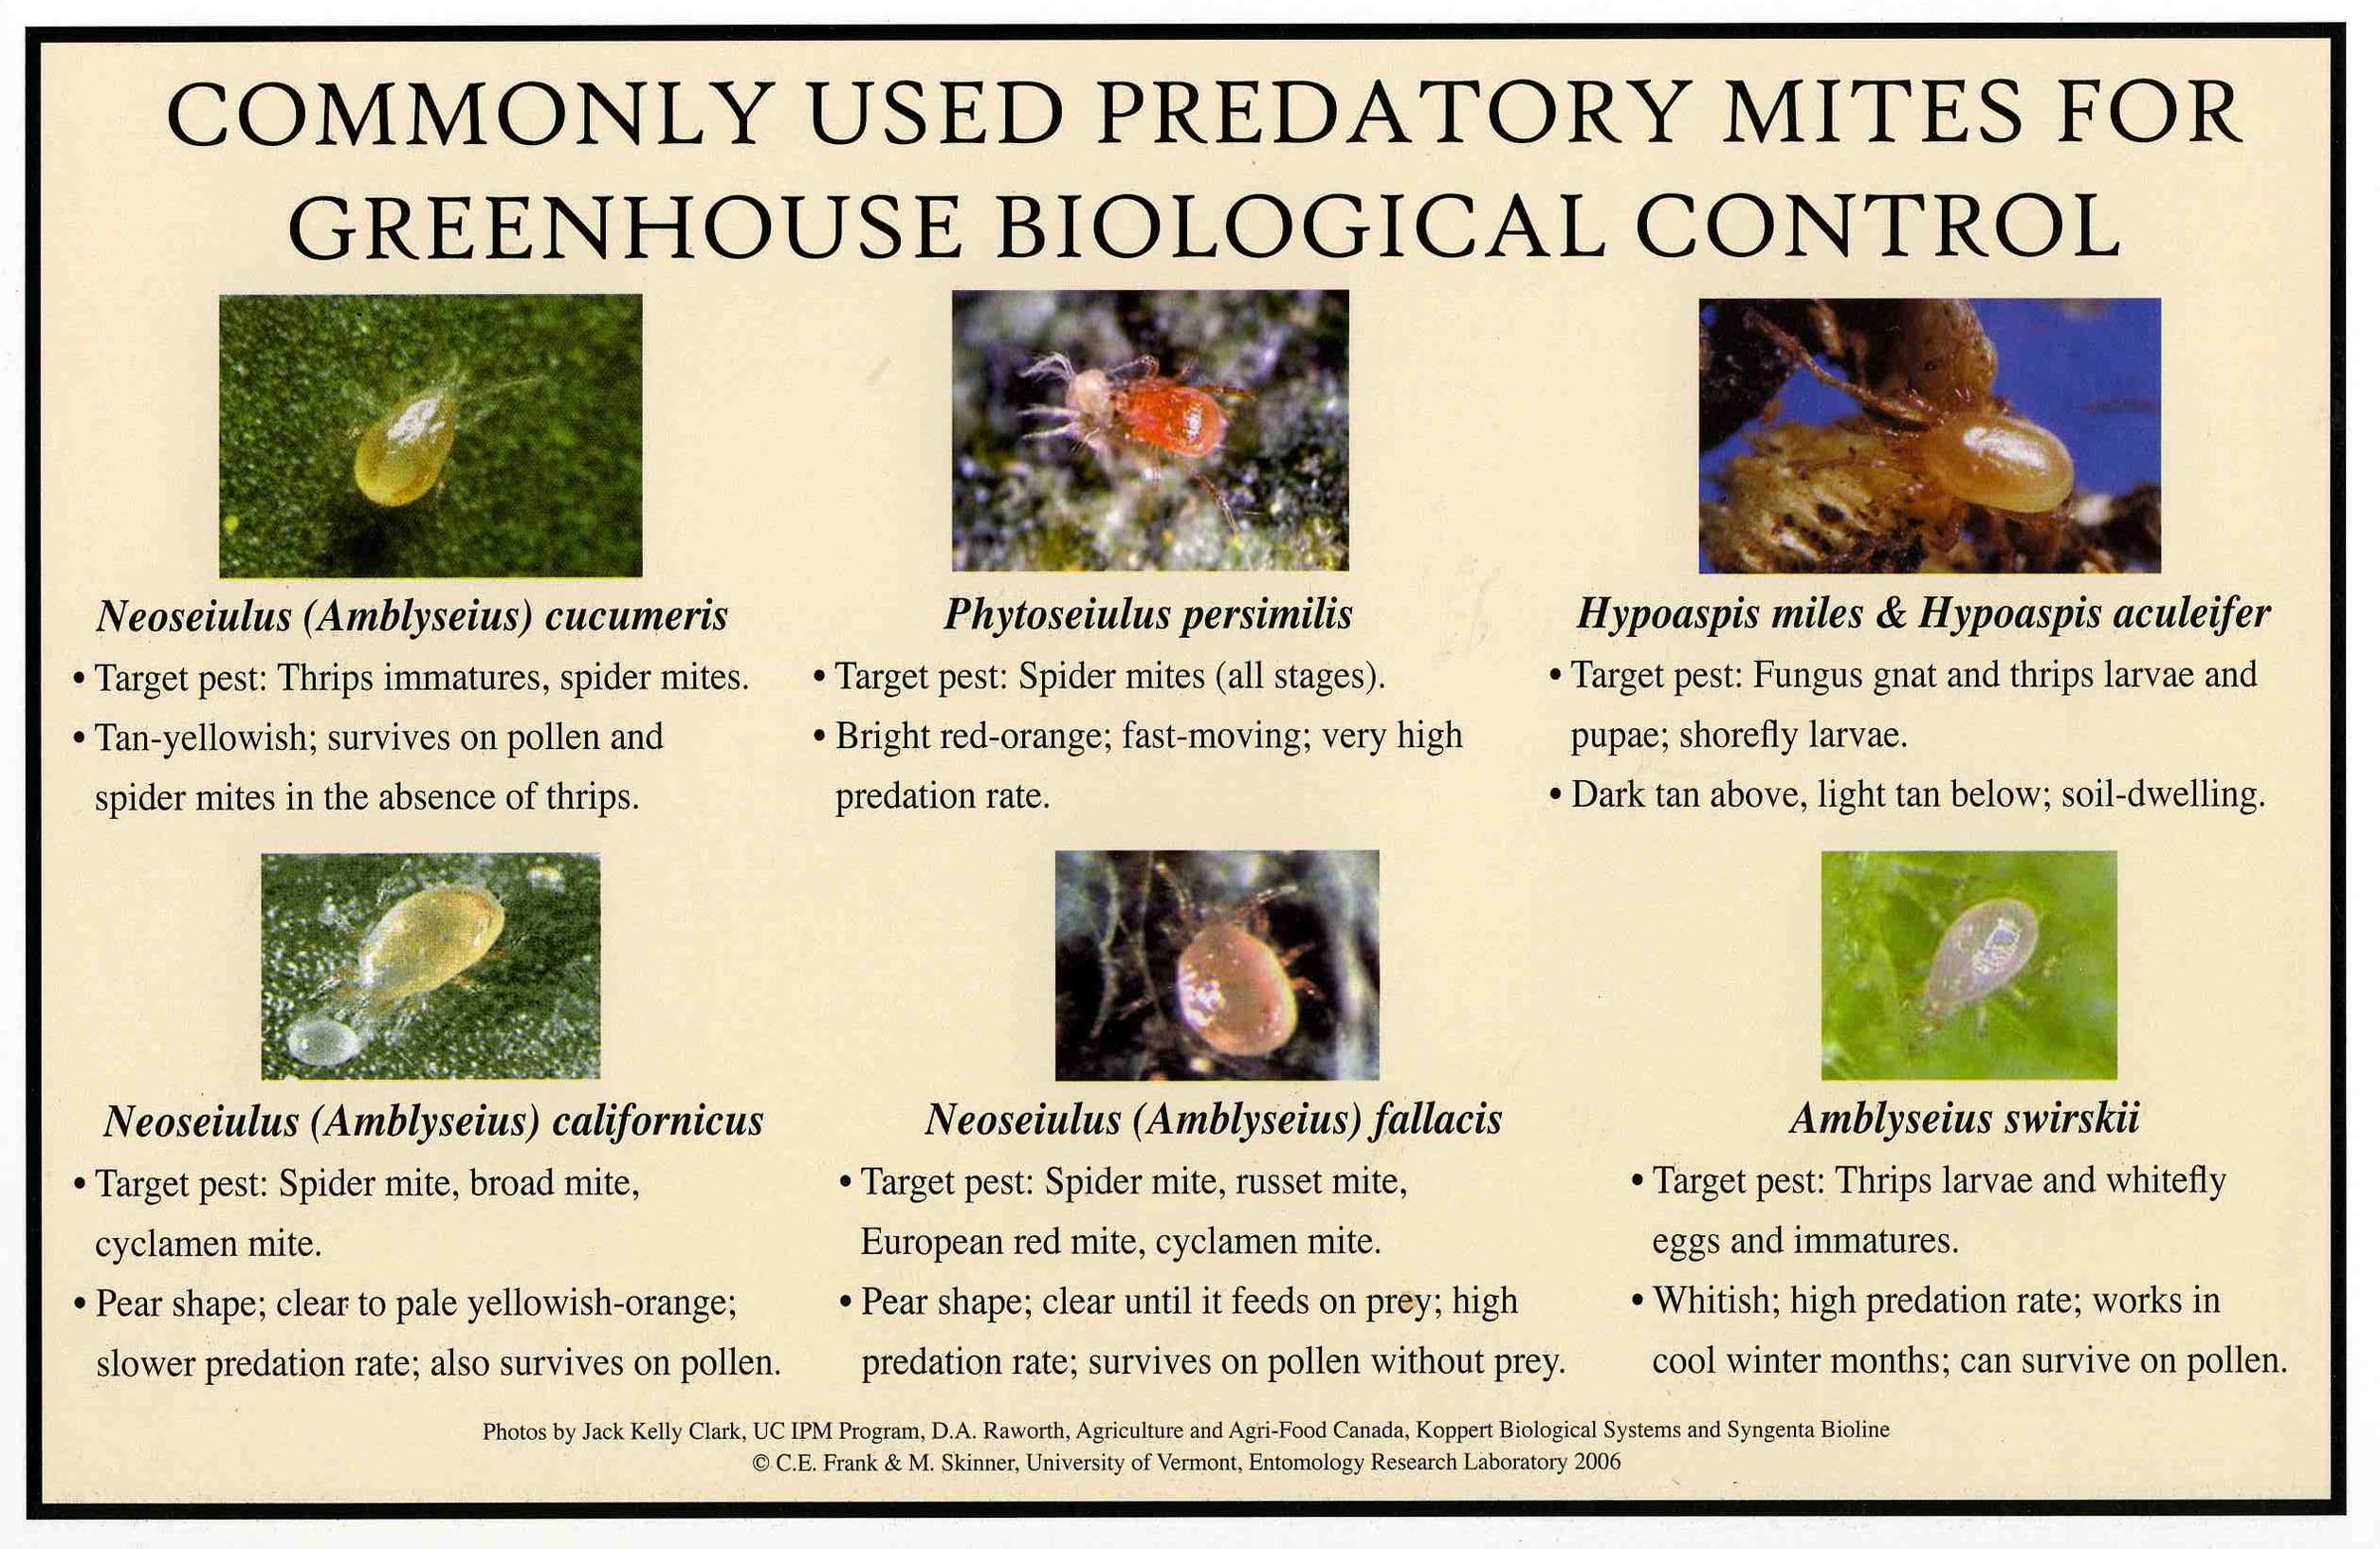
Link to some predatory mites
Try irrigating your
creosote bushes less often and creating less succulence. Water them like cacti
after they get established. Watering them every three weeks once they are
established should be enough.
Link to some predatory mites
Brown Spots in Lawn Probably "Frogeye" Disease
Q. I have some large dead areas
in my lawn. I don’t think it’s an insect problem. Watering is at 2 AM and 7 AM.
This was my first lawn problem in 16 years!
 |
| Unusual pattern for dead grass. Too random for irrigation I think. |
 |
| This picture you start to see the "frogeye" disease pattern. Looks like it could be a chemical spill. |
 |
| Here is where "frogeye" starts to make an impression. But its over. |
A. I looked at the
pictures you sent, but the last picture was the most “telling” to me. I think
your lawn had a disease problem that is now finished. Don’t do anything now! Let
me tell you why I came to that conclusion.
Insect problems here are not like those “rolling back
like a carpet” problems described in books and online. Those descriptions apply
to Kentucky bluegrass damaged by white grubs. We have grubs, but we don’t have
much bluegrass anymore. Our lawns are 95% tall fescue and tall fescue reacts
differently to insect damage. It pulls out like loose hair from an old animal
skin. Plus, the pattern of dying grass does not resemble insect damage.
I first thought the brown spots were an irrigation
problem, but the pattern doesn't fit an irrigation problem. With irrigation
problems, dead or damaged areas are in a pattern that relates to the location of
sprinkler heads. I didn’t know where the sprinkler heads were, but the damage
was irregular, so I ruled out irrigation.
 |
| Irrigation problems are nearly always easy to see how they connect to the sprinklers. |
The pattern does, however, resemble a chemical spill flowing downhill and damaging the grass in its path. It was a possibility, but the last picture looked like advanced stages of a disease problem. We used to call this disease Fusarium blight or “frogeye”. This disease has since been renamed Necrotic Ring Spot. I thought “frogeye” was much more descriptive.
 |
| Seldom will you see it this obvious but this is frogeye. See how it got its name? In advanced stages these dead areas can become one but you still look for little patches of green grass that would still be there. Sometimes its hard to see them. |
What led me in the direction toward disease were the
small patches of green grass still alive but surrounded by dead grass. These
small green patches of grass are how “frogeye”, now Necrotic Ring Spot, got its
name.
From the pictures, it looks like the disease has run its
course and the grass that’s alive is healthy. I say this because the grass
surrounding the dead areas appears healthy. This is the way lawn diseases
usually work. They have a window of opportunity, when the weather is right for
the disease to spread, and it takes off. The weather changes and the disease
stops.
You would be wasting your money to apply a fungicide now that
it’s over. But, don’t disturb the brown, dead grass and leave it alone until
fall. If you remove it now, it opens the soil to invasion by Bermudagrass.
Bermudagrass loves sunshine, bare soil and water. It hates shade. Wait until
the weather cools in late September or October, remove the dead grass and
either seed or sod these areas.
Subscribe to:
Posts (Atom)