Yes, growing plants in the desert is different than growing plants in other locations. I have lived in the upper Midwest, in arid Northern Colorado,the more arid Salt Lake city area and finally in the Mojave Desert. Yes, when I moved here it was dramatically different from the other locations I have grown plants.
Let's handle each category, how it differs from conventional gardening, separately. I will put them in the order I think they are significantly different from each other.
Desert Soil
 |
| That's my left foot in that picture in a raw desert soil in North Las Vegas, Nevada, in the Eastern Mojave Desert that has never been under cultivation. In other words, it has never had water applied to it to grow anything outside of natural rainfall. |
As far as desert soils go, I have lived and worked in Central Asia (Afghanistan, Tajikistan) since 2005. I am familiar with desert soils in the Middle East, North Africa and south Africa as well as locations in our Southwestern deserts. This is my take on desert soils.
The Mojave (Mohave) Desert is a very harsh environment to grow plants. It is harsher than Colorado, Tajikistan, Afghanistan, Northern Africa, most of Arizona, New Mexico, West Texas and beyond. It is the MOON!
 |
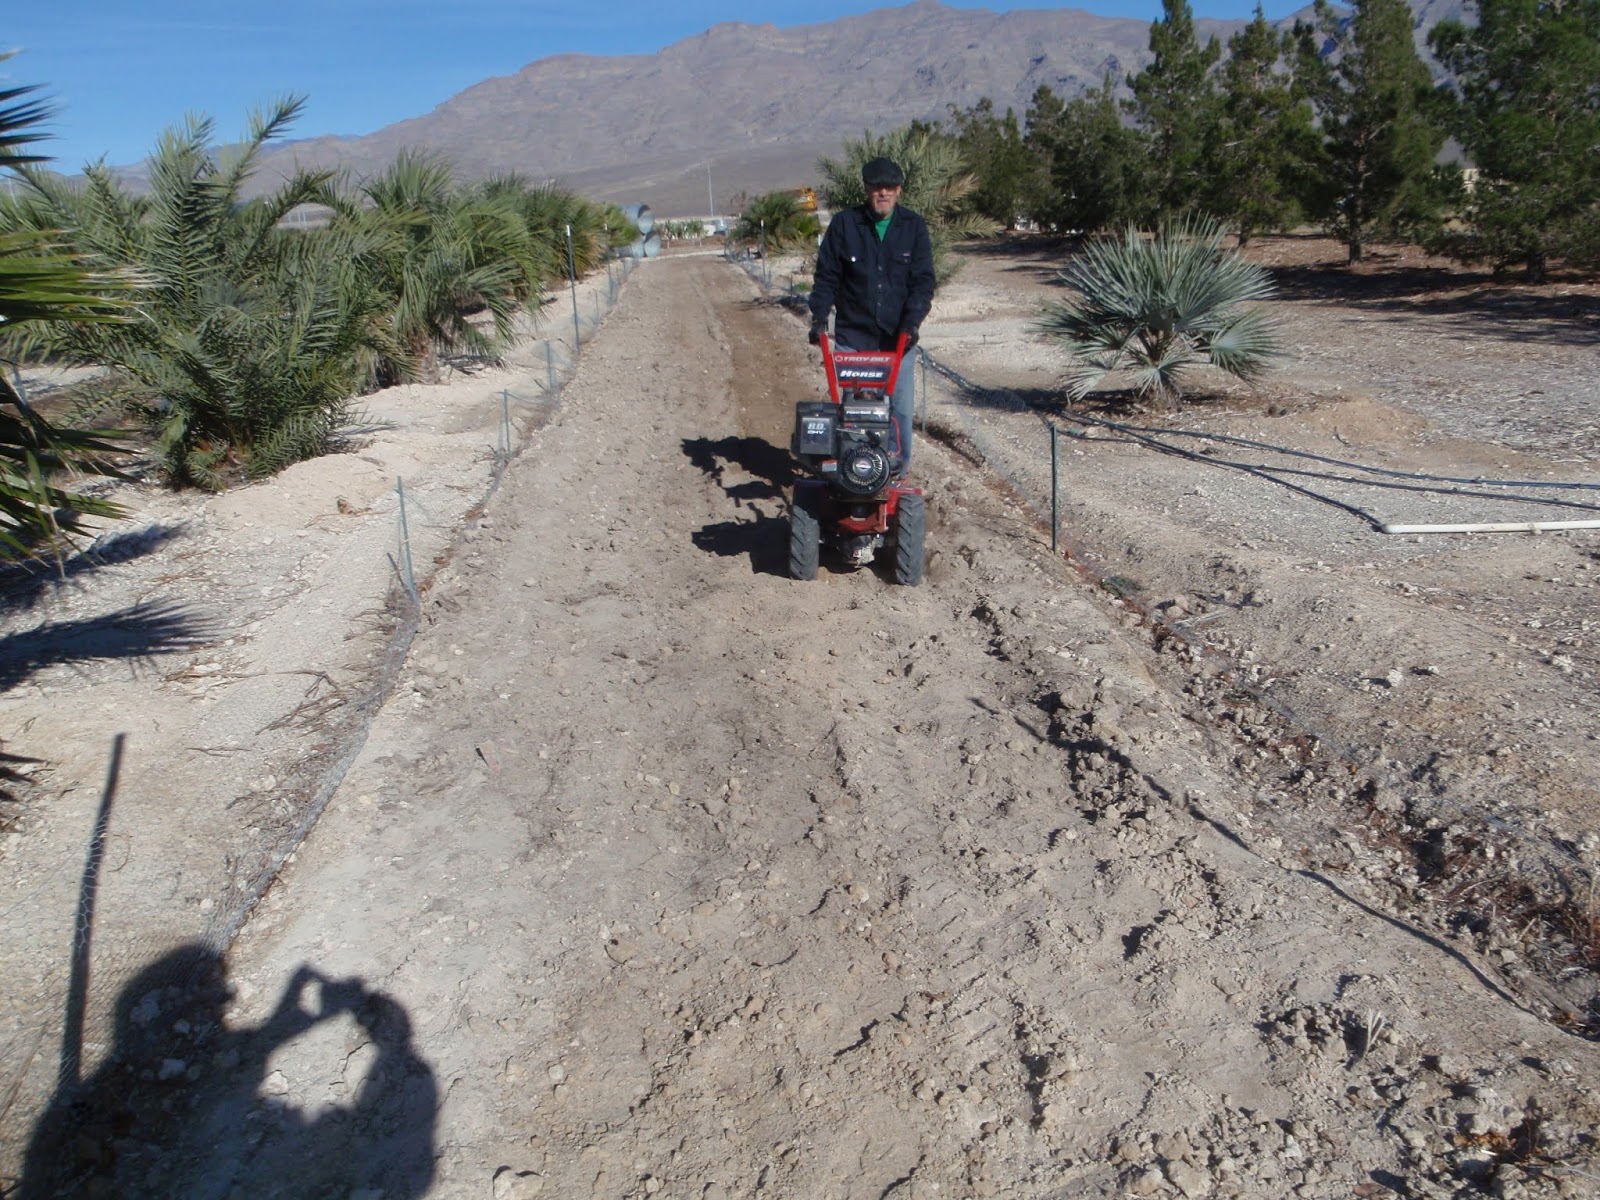
| This area is about 10 feet wide. I put as many trenches in this 10 foot wide area as I could space together. Then I flooded it with water using hoses. The water ran all night long to fill these trenches and wet that soil. I then had to wait for the soil to dry enough so it was workable with a tractor.There were 10 of these areas about 100 feet long. |
The first thing I look at in a desert soil is its color. Is it a light tan color like the picture or is it significantly darker brown. The second thing I use to get a handle on what I have to do with it is how hard it is to put a shovel in that soil. If I have to jump on the shovel and it barely goes in the ground or if the shovel goes in with less work. The color and how easily I get a shovel in tells me roughly its organic content.
 |
| This is the gasoline driven walk behind trencher I used to cut those trenches in the picture above. It would've taken me days to try to use a pick on that soil and not nearly as effective. |
How to Fix This Soil?
Water and organics. First you have to soften the soil with water then add compost to it or some other form of organics so that it stays "fluffy".
 |
| After waiting about five days for the soil to become dry enough so that it could be worked with the tractor, I filled the trenches with compost and put a thick layer of compost on top of the soil as well. |
 |
| Besides filling the trenches with compost to about 30 inches deep, a thick layer of compost was applied to the surface of the damp soil. The soil was dry enough for compaction not to be a problem but it still had some moisture in it, not enough to grow plants but a heck of a lot more moisture in it than it had under a hot desert sun with no rainfall. |
 |
| A series of different tractor attachments were used for deep cultivation of this soil, intermediate cultivation and finally seedbed preparation. |
 |
| Mark compost was added to the surface of the soil dependent on soil color. I wanted the soil to be a medium brown the first year we grew vegetables in it. |
 |
| The disc plow was used for nearly the final soil preparation and final mixing of the compost with the soil. |
 |
| That mixing wasn't good enough for me. The final stage of soil preparation was mixing the compost to thoroughly with the soil with a Rototiller.We weren't done. The raised beds needed to be shaped on both sides and a walkway created between the two raised beds. |
 |
| Two raised beds were created in this 10 foot wide area with the walkway in the center 18 to 24 inches wide. The walkway was created with a manure shovel and lots of work throwing the soil on both of the raised beds. The natural slope 45° slope of the soil in the raised bed kept the raised bed in place. The raised beds were leveled with a landscape rake. The raised beds were 3 1/2 feet wide not counting the slope. Drip tubing was installed on the raised beds. It was never the film drip tubing with emitters spaced every 12 inches and emitting 9/10 of a gallon per hour in each emitter. Emitters of the drip tubing on one bed were triangulated for better water distribution to the bed.spacing of the drip tubing allowed for planting on either side of the bed. Close spacing like onion and garoic would be 4 to 6 inches apart while broccoli and caulifower would be spaced 24 inches apart. |

 |
| Walla Walla onion produced in this amended desert soil three years later. |
 |
| Garlic trials conducted in amended desert soil.When building this irrigation system, PVC pipe was used in the footer and header and painted to prevent becoming brittle from the sun. You could also build footers and headers from blank polyethylene pipe. |
 |
| Some of the asparagus varietal trials in North Las Vegas in amended desert soil.Asparagus was planted in a triangular pattern with 12 inch spacing between crowns. Asparagus loves compost and moisture. Asparagus plots were covered in compost of every year during the winter. Drip irrigation moved the water through the compost carrying nutrients to the crowns planted 8 to 10 inches deep. |
Water and Irrigation
Another shortcoming of desert soils is because they are so dry. Water is needed but without amending the soil when needed, you are throwing your money "down the drain" so to speak. If your desert soil was used to grow crops previous to your inheritance, the soil will be a dark brown and easier to dig. Every year crops are grown in a desert soil, the soils are improved. If your soil had crops growing in it previously its color and texture will be different from raw, native desert soil.
Hand in hand with irrigation is water drainage through the soil. If your soil is not improved with compost or other organics, the water will not drain easily. Vegetable production will be poor. Nutrient content of these vegetables will be sad. If your soil needs it, improve the soil first!
 |
| Drip irrigation for a raised bed. The drip tubing emits 0.9 gallon of water per minute, 12 inches apart. I usually run this system for 30 minutes or until I see water escaping the raised bed. The drip tubing is held down with metal staples (that corrode in one season of use.) |
 |
| Metal staples holding drip tubing down after one growing season. Yes, that's my hand. |
 |
| When finished, drip tubing should emit water evenly along the length of the raised bed.I like the half inch drip tubing better than the much smaller laser tubing because they don't plug as easily. |
 |
| I started using drip tape for my onion and garlic variety trials because drip tubing didn't emit water close enough for me. I wanted water emitting about every 4 to 6 inches. Both onion and garlic are shallow rooted and the dry desert soil combined with the heat evaporated the water in the soil quickly.If I was very careful I could get two years from drip tape. I was not very careful. I could get over 10 years from drip tubing. Drip tape was cheap, about 7000 feet of it for around $100 back then.Notice how I put half inch connectors in the PVC 12 inches apart for different crops. If a crop needed wider spaced irrigations, I would adjust the drip tape accordingly.That orange "ball" is on top of a 24 inch long piece of rebar for safety reasons. The rebar is needed to stretch the drip tape or drip tubing tight enough so it's not blown by the wind and stays in a straight line. |
 |
| Drip tubing or drip tape will blow out of place unless it's tacked down with staples (which corrode in desert soils in short times) or pulled tight with rebar and cut to the exact length needed.Each of these irrigation plots are about 100 feet long and outfitted with a water filter, pressure regulator and battery-operated timer. The water is from a well so it can get dirty at times. The filter needs to be cleaned monthly during the summer and the system flushed at the other end same time. This gets rid of stuff that can cause plugging of the emitters. Even with that, I walk the lines once a month checking for emitter plugging because I can see it when the irrigation first starts up. Sometimes I have to get on my hands and knees and "suck the dirt out" of the plugged emitter holes. And I'm still alive.Oh, I forgot. You can cover the drip tape or drip tubing with soil to keep it from blowing away but it's hard to see if emitters are plugged or not. |
Rabbits can be a problem in the desert particularly in the spring. I use 1 inch hexagonal chicken wire 24 inches wide to keep them out of the raised beds. But those little baby bunnies in the spring are so small they can fit through that 1 inch hexagonal chicken wire at a dead run! I know. I have seen it happen. If they get trapped inside the raised bed they get fat really fast and can't get through the chicken wire. They are trapped. And tasty!The bottom edge of the chicken wire is buried about one or 2 inches below the soil surface so that its tight. Otherwise the rabbits can get under it easily.
 |
| Fence stakes are pounded into the soil in a straight line and a shallow trench is dug with a pick. Next, the 1 inch hexagon chicken wire is attached to the garden stakes. I was too cheap to run a wire along the top so the chicken wire was just tied to the garden stakes. The bottom edge was slightly below ground so the rabbits couldn't get under it. At least for the first couple years because the metal fencing corroded and then it was a free-for-all. |
 |
| Rabbit damage to melon. |
Heat
Probably the worst time to encounter desert heat is when you have to direct seed into raised beds. The surface of the soil dries out quickly when it's warm and particularly when it's windy. When it's hot the soil will get wet and dry out quickly. It's not so bad if your using large seed that can be planted a half inch or more in the soil. But it can be a big problem for small seed that is planted more shallow. The soil wets, then dries quickly, then wets and dries out again quickly. If this cycle of wet and dry dries the seed out as well, the seed will die. Mulch applied to the surface of the soil and shades it helps prevent these quick wet and dry cycles. Surface mulch helps keep the soil moist longer and improves the chance of seed germination.
Straw. I don't like straw but it's recommended a lot. It doesn't break down easily when its turned under. I like something that will "melt' into the soil over time and breaks down quick. Chopped straw would be better but I've never found it. Bales of straw are not cheap. When I was buying it, it was eight to $10 per bale. I imagine it's much more expensive than that now.

I started using horse bedding, pine shavings, and it works much better. When it's warm out and I have small seed, I put a thin layer of horse bedding on the soil surface after seeding, just enough to shade the soil surface and help keep it moist.
 |
| Horse bedding works better for me as a soil mulch then straw, grass clippings, shredded newspaper, etc.It's easy to turn it under and it disappears in the soil very quickly before the next crop get started. Pine shavings are nearly all carbon so just make sure the soil is rich when you turn it under and it will decompose and disappear. |
I tried using it in raised beds and container is at Viragrow where it was available. If you're going to buy something, it's cheaper and works better than straw.

Pre-Germinating Seed
Pre-germinating seed is soaking it in freshwater for several hours and then planting the seed while the outside is dry but the inside is swollen with water. The easiest seed to soak are the large seeds like corn, beans, peas, melons, etc. there is less risk to losing them if they dry out. If I pre-germinate seed I will usually get 24 to 48 hour faster germination. The first step in seed germination is called "inhibition"where water enters the dry seed and starts all the chemical processes needed for germination. Dead seed and living seed will imbibe water but only living seed germinates. If the seed is fresh, germination should be 98 or 99%.
Think about it. If seed is planted in warm or hot soil, it has trouble taking up enough water so it begins swelling and germination begins. This might take the seed three or four irrigations before it starts swelling up from the water. Soaking or pre-germinating the seed shortens this first step and can be effective when temperatures are warm and the air is dry. Some like the desert?
The trick when pre-germinating seed is to leave it in the water long enough so that imbibition starts but not long enough so that the seed dies from a lack of oxygen. Once the seed has imbibed water and it is swollen, it is removed from the water and the surface of the seed is allowed to dry. The inside of the seed is still swollen and full of water, but the outside of the seed is dry to the touch and can be planted by hand or by machine.
Besides the large seed of vegetables, I also soak dried garlic cloves and potatoe"seed" before planting. I throw a little bit of fertilizer in the water. There is nothing stopping the dissolved fertilizer from entering the seed when it's dissolved in water.
Humidity
Very little research has been done on the very low humidity of the Mojave Desert. It has been reported that a very low humidity (below 30%) will prevent some tropical flowers from pollinating. It is suspected that they low humidity interferes with pollen (sperm) survival and subsequent pollination.
.The humidity of the Sonoran and Chihuahuan deserts are often times much higher than the Mojave Desert, particularly during the summer months that they call "summer monsoon" season.This may be the reason why sweet cherries have difficulty setting fruit in some parts of the Mojave Desert even though flower production seems normal. This is also true of Haichiya Japanese persimmon. Fruit set is more common with these plants after a spring rain and the resulting higher humidity. Landscapes with lawns and pools seem to set sweet cherries more often than those without.
Intense Sunlight
The Mojave Desert has more intense sunlight than non-desert environments. It is thought that the lack of humidity increases the chance that the energy from the sun will reach the Mojave Desert while more humid climates contain water in the air that interferes with this transfer of energy from the sun. We can see this damage from intense sunlight on fruit and vegetables that are exposed to intense sunlight.
 |
| With damage from intense sunlight in the Mojave Desert. |
 |
| Damage to sweet peppers from intense sunlight |
Landscape Exposure
Growing vegetables in the hot South or western side of a building can be very damaging to vegetables or fruit trees. On the other hand, during the winter months this can be a very productive side of the landscape.
It's not a bad idea to have two raised beds for growing vegetables; one on the hotter side of the house for winter vegetables and another on the cooler side of a landscape for summer vegetables. There might be as much as a month to six week difference in when they produce winter and summer vegetables.
 |
| Hoophouse with 30% shade cloth. This amount of shade doesn't seem significant during the summer but the plants will react positively to the difference. |
Shade cloth
If sunlight is too intense for a vegetable bed, consider 30% shade cloth for flowering vegetables. For those vegetables that produce edible leaves as much is 50% shade might improve their quality. Experiment with some different vegetables using these two levels of shade cloth. Some vegetables like okra doesn't tolerate any reduction in sunlight intensity or it stops producing fruit.
No comments:
Post a Comment