Type your question here!

Saturday, September 10, 2011

Palo Verde Dont Like Butch Hair Cuts

Q. Attached are pics of a Palo Verde which has some unusual black growths on the upper sides of the limbs. I'm wondering if it has something to do with pruning, since it appears to be only in areas that have been pruned, although other pruned areas are unaffected.

Damage to upper surface of palo verde limbs from reader

Palo verde pruned too high, in my opinio, allowing for
potential sunburn on upper surface of limbs

Palo verde with sunburn damage, borer damage and
limb and trunk damage

A. My first reaction to the pictures was sunburn damage. But I would have to see if this damage was sunken like a canker.
Next I would take a sterilized knife and cut around the edge of the damage and through the damage to see if the wood below the damage was dead or not. If it was dead below the damage and the damage was sunken then it is most likely sunburn damage to the limbs.

The pics you sent had damage all on the upper side of the limbs which is consistent with sunburn damage. You wondered if it might be associated with pruning which it is. The big mistake people make on Palo Verde with the photosynthetic green bark like is pruning so much that too much light gets inside the canopy and burns these photosynthetic limbs. Even though the are designed to absorb light there is such a thing as too much light.

These trees don’t make a lot of shade and when we remove too much canopy we will get sunburn on the limbs. Once we get these limbs sunburned then we have to look for possible borer damage. They go hand in hand and several borers are general feeders and are not really particular what they lay their eggs on.

The adults focus on damaged trees for egg laying. So cut into the damage and look for football shaped exit holes about 3/8 to ½ inch long and ¼ inch wide under the damaged, sunburned bark. If this is the case, don’t prune so heavily next time and leave enough cover to prevent sunburn.

Ornamental or flowering plum leaves
with wind damage
Q. I put in a desert landscape with 2" of rock in the front yard with various bushes and 2 flowering plum trees. This probably was a mistake, as I read one of your articles which said that this type of tree is not suited for rock mulch. Anyway, my question is about watering the trees. I have a 28" diameter by 5" deep watering reservoir around each tree. There is a layer of bark mulch in the reservoir. Right now I water the trees twice a week filling the reservoir up twice at each watering.

This is purple leaf plum in a desert or rock landscape.
It will look good for about five years without much
attention. But after about five years it usually starts
with leaf scorch and may begin getting iron chlorosis
So far every summer around August some of the leaves partially dry out and turn brown. Is this caused by too much water or not enough? I water the bushes 3 times a week by drip system for 30 min per watering. They are all healthy and green. Also the bark on the trees are splitting in places and falling off. Do you think I will loose the trees at some point? Any advice will be greatly appreciated. I read all your colums in the RJ that you write. Lots of excellent advice there.


A. Flowering plums can handle the rock better because you aren’t really worried about a crop of fruit to eat. But the rock on top of the soil will aid in the depletion of organic matter and over time it will most likely turn the pinkish color that accompanies iron chlorosis in red leaved trees like the purple leaf plum. If not corrected that can lead to more of a decline in the tree opening it for dieback and insect/disease problems.

This is the purple leaf flowering plum when it has iron
chlorosis. Plants with green leaves will have their
leaves yellowing with green veins. In plants with purple
leaves the leaves will turn pink instead of yellow but
the veins will still be a darker color than the leaf blade
Bark mulch is not nearly as effective as plain old ugly mulch made from chipped landscape trees. Not many nutrients in bark, it decomposes slowly, and is all just about the same size so it doesn’t decompose as effectively as chipped wood mulch. Plus 28 inch diameter irrigation basin is not very big. As these trees get bigger they will need more water. Increase the basin to about six feet in diameter (three feet from the trunk) all the way around the tree and fill this basin which should be about three to four inches deep. Fill it twice with each irrigation.

Hard to say why the bark is splitting and falling off but I would pull the loose bark off and look for damage to the trunk such as holes for borers. The bark should be removed anyway of the trunk is dead under the bark and it is pulling away from the trunk. Often this type of situation turns into a long lingering death spiral for the tree over the next few years when it will decline more.

Fall Lawn Replacement in the Hot Desert


Upper surfaces of grass blades can help identify
which type of grass it is: L to R, Kentucky bluegrass,
perennial ryegrass and tall fescue
 Q. I need advice. We planted about 100 square feet of sod a couple of years ago. It had been doing quite well. I believe it was over fertilized 5-6 weeks back.. It is now very brown and not responding to watering. I plan on replacing it with new sod once it cools down. My question is, can I put the new sod over the old or pull out the old and re-prep the sub base? Any advice would be appreciated.

Sod removal using a sod cutter
A. You didn’t say what kind of sod it is but I am assuming it is tall fescue. Tall fescue represents about 98% of all lawn grasses in the Las Vegas area due to its tolerance, for a cool season grass, to our high summer temperatures. Before you do anything make sure it is dead. Tall fescue can appear dead but if you see any green at all at the base of the dead grass then it may just have died back.

Tall fescue is very drought resistant even though it uses a lot of water. It can dieback when water is not available and sit there for quite awhile appearing dead and then re-emerge from grass that looks dead and start growing again. This might take a couple of weeks of applying water after it turned brown. It might then be a bit sparse and you may have to seed into the grass again to get it to fill in those bare areas that didn’t make it.

Power rake, aka dethatcher aka verical mower used for
removing thatch, slicing stolons and improving
water penetration to turfgrass or lawn.
However, if it did turn brown due to a heavy fertilizer application then that is salt damage and tall fescue is not all that good in its tolerance to salt and then it is very probable you are right. You have two alternatives in replacing the sod. One is to rent a sod cutter and cut the old sod out leaving behind a ready made surface for resodding. Or you can try digging it out by hand and leveling the surface in preparation for the new sod. A lot of work. You will not be able to put new sod on top of the old sod. The old sod will leave an “interface” that will cause all sorts of problems for the new sod.

There is still yet another alternative worth considering. The dead grass is a perfect seedbed for seeding a new lawn. In about late September to mid October mow your dead lawn as short as you can and use your bag on the mower. Don’t mulch the dead grass back into the dead lawn. Next rent a power rake, sometimes called a dethatcher, and dethatch the dead lawn deep enough (you can adjust it) so that when you make a pass or two you can see soil between the dead grass blades. It is important to see bare soil throughout the dead lawn.

Patchy look to a lawn when a coarse textured grass is seeded
into a finer textured grass. An example would be seeding
K31 or Kentucky 31 tall fescue (a pasture grass) into bluegrass or
even a turf-type tall fescure with a finer texture
Purchase good quality tall fescue grass seed, 100% tall improved tall fescue and not Kentucky or K31 tall fescue, the cheap stuff. Apply a starter fertilizer such as 16-20-0 or any fertilizer high in the middle number(in this case 20) but having some of the first number (in this case 16). Seed at about 10 to 12 lbs of seed per 1000 square feet and topdress it with topdressing or steer manure with NO MORE than about 1/8 inch of topdressing. It is best to do this with a roller for applying this stuff. You can rent one from most rental places. Irrigate about three times a day for a few minutes each cycle. Irrigate long enough to wet the topdressing but not long enough to cause it to run off of slopes or puddle. Do this about 8 am, 1 pm and 6 pm. Your biggest challenge will be keeping the pigeons and other birds off of your seeding. Reduce your watering to once a day when you see grass emerging usually in 7 days or less.

A wild idea would be to not use tall fescue but a different grass seed that has high tolerance to heat in our area and a much softer feel to it. These are the heat tolerant perennial ryegrasses. They are superior to tall fescue in feel and water use but you have to get the right kind of perennial ryegrass. Some perennial ryegrasses are very heat tolerant and others are not at all and will burn up when it gets hot in the summer.

One of the best of the perennial ryegrasses is a combination of Palmer and Prelude perennial ryegrasses. It has been used on golf courses for nearly 30 years now here and does very well in the heat. You can mow it short as close as ½ inch or less (if you seed at the right rate for this kind of cut) or even up to two inches. It is soft to the touch, unlike tall fescue which has tiny hooks on the edges of the leaf blades that can cause “itchiness” some people think is an allergy which it is not. The problem is that it is only available in 50lb bags. This seed blend is available in Las Vegas from Helena Chemical Company but it will be pricey in that quantity. I could not find it on the internet in smaller quantities.

Monday, August 29, 2011

Newly Planted Apple Tree Dead

Q. I've attached a picture of what was once a beautiful, thriving Golden Delicious apple tree. Within one week it turned brown and died. It’s a young tree. I didn't plant it myself I purchased my home last July and it had just recently been planted.

Figs Grow Great in the Mojave Desert

Q. A friend of a friend has two fig trees that produce just the best figs I have ever tasted. So I am planning on taking cuttings and eventually planting them in my big back yard with full southern exposure. However we do not know what variety they are, so is there an easy way of identifying them and knowing whether they are self-pollinating, i.e. whether I need to plant two of these trees?


A. All of the figs I have tested here in our climate do well with very few problems. It is just a matter of your preference in taste. Normally, the darker colored figs such as black mission or brown Turkey have a stronger flavor. The yellow or white figs are milder in flavor. The biggest mistake when growing figs here in our climate is not watering them with enough water during each irrigation. They are oasis plants, not desert plants.
One of our "white" figs, perhaps 'Desert King'

Nearly all figs are self-fertile so there’s no need to have more than one. There are so many different varieties of figs it would be very difficult to identify which fig it might be. However, if you send me a picture of the fresh fruit so that I can see outside fruit color and color inside the fruit (cut open) I might be able to narrow it down for you.

Also, let me know if it was purchased through a local nursery since they typically carry the more common varieties. This also helps narrow it down. Follow my blog and I will give you some step by step instructions on how to propagate figs and grapes as well in the near future.

Lowering the Height of a Large Tree

Q. I have a view of the valley for a few months of the year when the leaves of many trees behind my property are gone. The partial view is still manageable the rest of the year except for a tree that is very, very full and you can see nothing beyond or through it. I know I can't ask for that tree to be topped. But what would happen if I asked for some branches to be removed in the middle of the tree so that it wouldn't be obvious to anyone? Before I go before a Board and ask such a question, I would appreciate your views on doing this and what the consequences might be down the line.

My Lawn Is Watered Enough It Has To Be Bugs!

Q. Do I have a bug problem? Spots in various areas of the lawn. I water enough.

Lawn suffering from a lack of water. Brown areas are
undefined and kind of run into each other. Pattern
of damage is related to the irrigation pattern.

A. So if you believe you water enough let’s go ahead and eliminate the possibility that you underwatering, overwatering, and getting even water coverage over the entire lawn through a properly designed and installed irrigation system.

That system should have what is called head-to-head coverage (water from one sprinkler should be throwing water all the way to the neighboring sprinkler) and a pressure regulator should be on the system so that water pressure at the sprinklers is not excessive. This helps prevent misting due to excessive water pressure.
This is the lawn disease called "summer patch". It has a
definite pattern to it. Kind of horseshoe-shaped
or the brown damage has a green patch in the center.
 Can you see the pattern?
Brown spots from watering problems usually occur in the same spots year after years and do not “move around” in the lawn. These spots are usually either next to the irrigation heads, halfway between heads or along the edges of an irregularly shaped lawn.


 So now that we have eliminated those problems since you water enough let’s move on to “bugs”. “Bugs” will usually include either insects or diseases. In tall fescue, the most commonly planted lawn grass for homeowners here in our valley, this is the time of year for disease problems. The most common lawn disease right now is summer patch and often accompanies our “summer monsoon” season.
Here is "summer patch" when you look
at a bunch of the running together.
We say the pattern has
"coalesced" resulting in tufts of green
grass growing in among the damage.
The spots start out as brown patches about 8 to 12 inches in diameter and frequently shaped like a partial circle or horseshoe. As this disease advances these brown spots blend together, if there are enough of them, into a wiggly or “snake” pattern of brown, dead grass. If you look at the green grass in amongst the dead grass, the green grass will be in circles about six to eight inches in diameter.

Make sure you are watering a few hours before sunrise, giving the lawn a chance to dry out as the sun comes up. Mow at 2 to 2 ½ inches in height. You can apply a fungicide that includes summer patch disease on the label and follow label directions.


Stop Horsing Around With Those Fruit Trees


Pruning cut healing with the cambium and wood "rolling"
over the damaged area.


Q. Short story, we had a horse get out of their corral while we were out of the house today for probably 4-5 hours. While out, he ate most of the bark of 60% of the trunk of one of our pear trees. The tree has quite a bit of fruit on it right now, we are more concerned with saving the tree than this years crop. Suggestions or ideas on anything you would suggest we should do would be very much appreciated. We live out near the orchard in the northwest, the “exposed” part is a direct west sunlight direction.

A. Long answer. The good part of this is that your tree, provided it is healthy, will probably survive. I have had fruit trees with that much damage to the trunk survive in the past. Your horse probably ate all the way down to the wood. This means that the tissue which transports food from the leaves to the roots is gone in that area as well as the tissue which transports water from the roots to the leaves. With 40% intact on the trunk the tree may struggle but it should still survive.

I would recommend that you mulch the ground around the trunk with wood mulch which you can obtain free from our orchard. Saturate the ground around the trunk of the tree with water 2 to 3 times each week. Clean the wound created by the horse with a sharp, sterile knife, cleaning the jagged edges of the damaged bark so that it is smooth. You do not need to paint the wound with anything. Just let it go after you have traced the wound with your knife. Make sure you fertilize the tree next January and each January while it is trying to heal. Enjoy the fruit. But next year thin the fruit out why it is the size of the silver dollar so there is only one fruit per cluster.

Planting Blueberries In The Hot Desert And Poor Soils Of Las Vegas? Hahahahaha. Maybe.


Q. I am interested in planting various fruit trees in my backyard. One that I am curious about is growing blueberries in our region. Do you know how they do here? Would you have any recommendations? I did not realize the varieties of blueberry plants that are out there! In my search I also came across pink lemonade blueberries, I am definitely interested, but I do not want to put forth the effort if they will not be a productive plant in our area.


A. This is the case where your gardening skills are going to be challenged. They are definitely not suited to our climate and definitely not suited to our soils. So let’s give it a try! This means we have to modify the climate they are in as much as possible and also the soils.

Pick a microclimate in your landscape that will be as cool as possible yet still provide 6 to 8 hours of sunlight everyday and out of strong winds. This would most likely be an east or north side of a landscape that avoids late afternoon direct sunlight. Find a location or create a location that is protected from prevailing strong winds.

Next, modify the soil. Blend anywhere from half to 2/3 of the existing soil with a good quality compost. To this mix, and sulfur that is as finely ground as you can find or in a liquid form. If you are not opposed to it, and aluminum sulfate to help lower the alkalinity. Water the soil thoroughly and let it drain several times before planting.

Use only southern high bush blueberries in the planting holes and space them according to the directions. Stake the plants securely in the soil the first season of growth. You will need pollenizers so make sure you get the correct blueberries together for good fruit set. Drip irrigation can be used or you can flood the area with water from bubblers.

Cover the planting area with 3 to 4 inches of wood mulch, keeping the mulch away about 6 inches from stems that enter the soil. Grow them for one season and see how they do. If you see signs of leaf scorching on the edges you might to put 30% shade cloth over the top of them to help them a bit from intense sunlight.

Every year you should be adding compost and acidifying the soil with finely ground sulfur or aluminum sulfate plus a good fertilizer and a soil applied iron chelate containing EDDHA. This is done in the spring before you see new growth. This should help get you started.

In the Desert, No Water - No Plants


Q. I live in Arizona and don’t know much about plants and gardening. I do have aspirations to do more. I’m loving your blog and working on reading back posts. I would like to get your recommendations on what kind of tree to plant. I have a rental property where the entrance to the property is plantless and has a small gravel landscape. I’ve included a picture of the property with boxes around where I’d like to do something. There is no water source. I would like to plant a tree or maybe bushes in front to add color and make it more appealing. Since there is no water source it would need to have low water needs. Something without thorns is ideal because there are children. However because kids climb trees maybe thorns are good to prevent them from climbing and stressing the tree. What would you recommend?

A. You will have a rough time without a source of water and it is doomed to fail or look horrible. Plant quality is directly related to the amount of water it receives. Our research has shown even a 25% decrease in water will lead to unacceptable plant quality. In the desert you have to have a source of water for urban plants particularly on a rental property. Once you have water established then let me know where you are and your elevation and I can forward some recommendations.

Wrapping Cactus in Burlap for Winter Protection


Q. I bought 3 cacti about 8 years ago and don't know their variety. Most tall cacti I see around town are very old Saguaros. The biggest one towers over the cactus garden at nearly 12' high growing over a foot per year! Can you identify them? Also the photos show problems that I hope are cosmetic. By the way, I have never wrapped them to protect from the frost and now they are just too big to reach. Do you know how tall this kind of cactus get in Las Vegas?


Cactus with blemishes. Not that it is on older pads
and stems, not the newer ones indicating
that it was probably caused awhile ago
and the newer growth appears to be fine.

A. For identification of cacti I would get hold of the local cactus and succulent society in Las Vegas. I am not a huge fan of wrapping saguaros during the winter. I believe this causes more damage than it does good particularly if we have a wet winter. Note that the discoloration occurs on some older pads and stems while the newer growth doesn't have it. Whatever it was happened at one point in time and is not affecting it anymore.

I’ve seen them wrapped in burlap here and personally believe this is a mistake. One wet winter when they were unwrapped they were covered in surface blemishes, perhaps bacterial necrosis from having wet burlap in continuous contact with the plants surface.

A certain amount of scabbing or blemishes are going to occur and all plants and should not be a problem if the plant is healthy enough to contain them. You might want to consult http://ag.arizona.edu/pubs/diseases/az1124  for more information.

Yes Canna Lilies Can Be Dead Headed

Tropicana Canna Lily
Canna Lily 'Tropicana' picture obtained
from

 
Q. Dead-heading canna lilies seems to work but results in the stalk getting very high and less stable as the flowers become smaller. At times I'll cut the stalk off at it's base if the leaves start to lose color or get wind-tattered but the plant may get really thinned out especially as winter approaches. Is there a best way to dead-head canna to get maximum flowers?

A. It sounds as if you're doing it correctly. As the individual flowers fade or are spent, twist them off of the flower stalk.  Some flowers will be smaller than others.  Dead-heading flowers doesn't necessarily mean the flowers remaining on the stalk will get a lot bigger.  It does conserve energy for the entire plant so the number of flowers or the relative size will increase overall and help conserve energy for growth and flower production in future years.  You were still going to see a difference in flowers size among the flowers on a single stalk.  As the flower numbers in size and no longer serve you, then remove the entire stock at its base.

By the way, canna lilies very well in our desert climate and add a touch of a tropical feeling to any landscape design.

Watermelons can be thumped, turn yellow and grow pigtails when ripe

Crimson Sweet watermoelon and
Persian melon at the orchard

Q. I have several watermelons on the vine. How am I able to tell when they're ripe? Can you "store them" on the vine? I had one split open by itself and it was mostly white inside. After 50 years I still have trouble buying a commercial watermelon, whenever I think I have found the right characteristics I'm proved wrong.
A. Watermelons do not continue to ripen after they are picked so what is important to pick them at the right time. This is not true of many of the other melons such as muskmelon. Once picked from your garden, you can store many melons at 50-60° F for a couple of weeks. This may not be true of store bought melons.

Basically there are three methods used for determining if a melon is ripe or not. This includes the color of the melon touching the ground, thumping them and drying of the tendrils on the vine close to the fruit. Personally I just use two; the color of the melon touching the ground and thumping. Tendrils are tiny extensions of the vine close to the fruit that look a little bit like a corkscrew or pig’s tale.

The bottom of a watermelon should be turning lemon yellow instead of pale yellow or white on many watermelons. Thumping watermelons can be tricky unless you can learn what the thump is supposed to sound like. It should have a dull, resonating sound that vibrates through the entire melon. It is important to pickup a melon to thump it, not leave it on the ground when thumping. If you’re in a store, pick it up to thump it.

Don't Let Anyone Call You A Plant Butcher - Pruning Shrubs In July

Q.  I have some bushes in the front garden that hide the front door. Due to a recent break in on our block, I want to trim these bushes. However, if I trim them as low as I'd like, it would expose bare branches. Will exposing these bare branches cause new growth to occur or do I have to cut them to the ground and start over?

Pruning cuts like this heading cut results in
many side buds below the cut growing, all fighting
for light and dominance.

Closeup of heading cut and side buds breaking

A.  I would not cut these branches at this time of the year which is late summer. Light pruning can be done during the summer months but if you cut into older wood you may cause some serious damage. Wait to do this type of pruning until at least mid fall, around October. It would be good to know what kind of shrub it is. Some shrubs respond to pruning very nicely while others really struggle to grow back. In making the pruning cuts it would be wise to make thinning cuts rather than heading cuts. Heading cuts are like giving the shrub a butch haircut. We usually call this type of pruning, butchering. Cuts are made indiscriminately anywhere along the branches frequently all of the same height. This is a big no no no no no.

Shrub showing lots of older wood that may
be slow to come back from pruning
cuts particularly during summer months

Thinning cuts are removal of entire branches back to another major branch that leaving no stub. Identify the branches which are the tallest visually. Follow this branch down along its length until it intersects with another major branch. If this intersection is low enough, make the cut so that it removes the taller branch that you followed. The cut is made flush, leaving no stub. Identify another tall branch and do the same thing, tracing its length down inside the canopy until it intersects with another branch and remove it. Do this until all of the branches which are too tall have been removed to another major branch deeper inside the canopy.

This technique called thinning maintains the integrity of the shrub and its eye-appeal without damaging it and causing a surge of growth that will be unsightly. If you do this, no one can call you a plant butcher.

Getting to the Root of the Tree Problem. Can I cut them?


Roots to be cut by reader
Q. I have, what I believe is a Fan Tex Ash Tree in our backyard. There are some roots that are on the top of the ground that are lifting up a concrete edging. My question: is it safe to cut these roots out so I can put the concrete edging back down. Attached are pictures. The first two are the roots in question. The third is an overall picture of the tree. We have only been in the house since November, but the tree seems to be in good health. It has a nice shape and when the leaves were still there it looked quite nice. By the way, I would estimate the roots have a diameter of 4 or 5 inches (but that’s just a guess).


A. You can safely cut and remove the roots you have shown me without any problems. Make sure you sanitize your cutting equipment and keep the wounds sanitized and clean for about 48 hours after you cut them to prevent any type of infections. This can be done with alcohol.

A bigger problem that faces you is how close the tree is to the wall. This tree is far too close to that wall and will eventually cause the wall to crack and heave. I would recommend that you remove that tree in the next few years.

Now is a good time to make a new selection, plant it and get some size on it so that you can remove the ash. Keep trees at a distance from walls at least half the radius of the canopy (1/4 of the diameter of its canopy spread at mature height).

Someone's Drilling Holes in my Trees!

Sapsucker damage to upper limbs of apple


Sapsucker picture I found on the web, not sure its the
right one but the idea is the same


Damage to another apple
Q. I have a nine year old semi-dwarf green gage plum tree in my yard. About a month ago I noticed about 20 small holes grouped together on one of the limbs. Each hole is a little less than 1/4 " in diameter. I can see no other holes on the tree. It is as if someone had taken a drill and drilled several small holes on the limb, and deep enough to get through the bark and slightly into the flesh of the tree. Any idea what may be causing this? This has never happened before. I did dormant spray the tree in early January. Do I need to spray the tree with insecticide?
A. This is most likely sapsucker damage to the tree. Sapsuckers are birds in the woodpecker family of birds that make holes in trees and feed on the sap or look for insects. I believe they are migratory here and cause damage as they pass through this part of the country. If I am seeing the image in my mind correctly this is not due to insects or borers. This is what the damage looks like. The best control is to protect the trunk or limbs with wire cloth or chicken wire. We have trees that get damaged in the orchard by these birds and they have survived this way many years as long as they are healthy. It is definitely not good for the trees but there are not many other alternatives They seem to like some varieties of fruit trees more than others.

Getting Those Fall Tomatoes Producing in the Hot Desert is a Challenge.

Q. I have no problem getting medium-sized tomato fruit from my Spring crop. The fall crop has been another matter. It is a game I play every year, much like Lucy holding the football for Charley Brown in the comics, only to pull it away at the last minute as he tries to kick the ball. The trick is to start plants early enough to have ripe fruits by December, but not too early to watch plant growth succumb to the feedings of white flies, aphids and tomato fruit worms. This year I lost again. Our first frost came a week earlier than I expected. Trays of green tomatoes anointed with an ethylene-producing apple ripen in trays in my garage, presaging another crop of fried green tomatoes for our dietary this December. Yet there is a bright side. This year I have grown the largest green tomatoes yet, suggesting the heat of May probably suppresses growth of larger fruits in Spring. So much for trying to grow beefsteak and other types of allegedly huge tomatoes next Spring. But come next August, as the eternal optimist, Early Girl and I shall try again.


A. In this climate is very discouraging in the fall with tomatoes due to the short season we have from ideal fruit setting temperatures around 90F and below and the number of days till frost. And of course as the frost approaches these fruit slow down as well. In the spring it is more ideal since we have some good fruit setting temperatures and then the heat comes. The tomato fruit likes the heat so that doesn’t interfere with production. They stop setting around 95F so you get a bunch of tomatoes that set at temperatures below 95F and the vines stop producing usually in late July. Late July is the time to begin cutting them back, fertilizing and getting set for fall temperatures below 95F.

This past fall we had an unusually early frost in November so unless they were protected the vines died. There are a couple of approaches that can be used for fall production of tomatoes. One is to remove tomatoes when they no longer produce and replant with varieties that produce in fewer days. Early Girl is a good choice with setting fruit at 50 to 62 days after transplanting but even better choices are the cherry, grape and pear types that set fruit easily in our climate.

One technique I have used in the past is to pull the entire plant from the ground before a freeze and hang it in the garage. The fruits will continue to ripen on the vine and slowly rather than ripening all at once as they do when they are picked from the vine. You don’t need the apple. Once picked they start producing their own ethylene but putting a very ripe banana or apple (banana is best) will hasten the ripening process.

Leaving Almonds on the Tree After They Split Can Lead to Problems


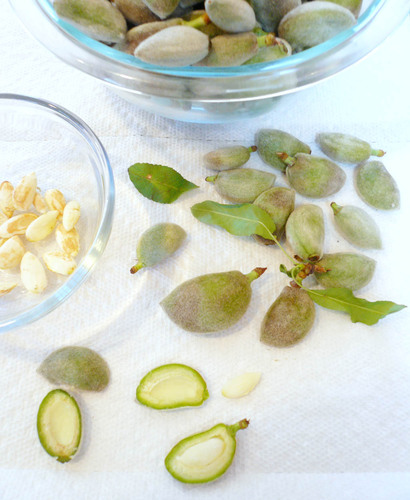
Almond splitting

Q. We have an All-In-One almond tree with the shells just now starting to break through the skins. I was told that September is when the nuts are harvested. I’m wondering if you have a rule of thumb on harvesting these trees.


Green almonds at the right stage for harvesting
 A. You can start harvesting any time after the husk splits open. The sooner the better if you want to avoid problems. If you do not have ground squirrel problems that will steal the nuts from your trees. Insects will enter the split husk if you are not careful. If there is rain you run the risk of having the nuts mold after splitting. When you see them split, harvest and put them in a protected area in the shade to finish drying. Then you can leave them on the tree and let them Dry there. If you have ground squirrels, then it is best to begin to harvest them now and put them somewhere to dry. Ground squirrels can clean up the tree in one or two days. They will be all gone. Right now at the orchard ground squirrels have devastated most of the remaining almonds on the tree.


Green almond taken from the husk at the right stage

We harvested most of the almonds green last April. Green almonds are used in some Mediterranean recipes. We sold them through a broker to one of the San Francisco farmer markets for $4.00 a pound. Birds can also cause damage but ground squirrels are the worst. I have attached a picture of an Almond which is ready to harvest. Some almonds will split entirely open to the nut while others do not.


Saturday, August 13, 2011

August Todo List for the Orchard


Zinfandel
I know that you’re harvesting wine grapes right now but July and August are the months for harvesting plums and plum relatives such as pluots as well. Plums such as Emerald beauty and Elephant Heart should be coming on soon or ready now. Flavor Queen pluots should be ready or very close to being ready.

There should be apples coming on so walk the apples and see. If the apple looks like it might be ready then bite or cut into it and inspect the seeds. The seeds should be brown if they are ripe and ready to pick. Do some fruit evaluations on apples if they are ready. Remember to get multiple brix readings and do not combine evaluation scores but record them all independent from one another.

Hosui Asian pear 2009 and we are now working on
developing size by increasing our thinning
Yutaka on Saturdays can give you some advice regarding Asian pears but the early producers should be coming in soon. Please get some evaluations of this fruit as it ripens because we have scant data on how well they are performing. Last year was the first really good year for many of them and many achieved very high quality both visually and taste. They are getting better and better under Yutaka’s watchful eye. This is an important fruit to document since this is definitely not the Asian pear climate.

The remaining almonds were pretty much decimated by ground squirrels before I left. Good thing we sold a lot of them as green almonds this year. That would be a good market for us next year if we can let local chefs know that we have them. They went to San Francisco this year and sold at $4.00 per pound that their farmers markets. We sold them to a broker for $2.00 per pound.

Fallen fruit is always going to be a problem this time of year and if you do not keep it picked up you will have an outbreak of pests that attack ripe fruit such as the confused sap and dried fruit beetles. Fallen fruit should not be kept very long in buckets or exposed to the open air or the same thing will occur. If you leave the fruit sitting in buckets you are just moving the potential for infestation from the orchard aisles to buckets. These beetles can fly and they will go out looking for girlfriends and boyfriends. Remember, we used to put them in large containers that had lids. The lids kept them from getting infested. Somehow you need to keep this picked up fruit from getting infested and not leave them exposed.

Bubblers should have a perfect cone if they have no debris
in them and the pressure is adequate.
Because of the frequency of irrigation right now bubblers will have a tendency to plug more often. Once a month the irrigation bubblers need to be walked and checked for plugging. The easiest way to do this is to use the remote for changing irrigation stations and have two or three people inspect the bubblers for plugging. These inspectors should carry spare cleaned bubblers and replace plugged ones as they see them. You can flag the plugged bubblers and when the irrigation has moved to the next station then replace the bubbler unless of course you are hot and want a shower.

Pests that can occur now are still the peach twig borer which is the little worm that gets in the soft fruit, dried fruit beetle if you don’t pick up fallen fruit and we may have a short outbreak of Green June Beetles but they will be gone in a couple of weeks if they occur. It is also possible that we can act of revisit by the grape flea beetle soon which chews holes in the leaves. They cause some damage to the leaves but we don’t get real excited because the damage is minimal and they disappear in a couple of weeks.

I am sure Jon will have numerous things to do but here it is a short list of things that might be coming up in the orchard

Jujube fruit from the contorted jujube. There are quite a few
varieties to pick from. Along with almonds displayed still
in their husks these are showstoppers at farmers markets
because people want to know what they are
Remember to keep harvested fruit out of direct sunlight as much as you can or you will build up excessive heat in the fruit and internal breakdown of the fruit will happen much more quickly. After harvesting put the trays in the shade of the trees until you are ready to take them to the cooler or the shaded area.


Todo for August

• Pick up fallen fruit and make sure they are properly disposed of
• Irrigate and make sure bubblers are not plugged.
• Help with the wine grape harvest on Saturdays.
• Inspect apples for ripe fruit.
• Inspect late plums and pluots such is Emerald Beauty and Elephant Heart as well as Flavor Queen pluot if they have not already been harvested.
• Vegetables should be sprayed regularly with our insecticidal soap.
• Inspect asparagus for female plants and remove them.
• There should be table grapes and figs ready for harvest
• Don’t forget jujube as it should be coming in very soon. Some people like it mottled brown and green and still plump while others like it dried, brown and shriveled. It would probably be a novelty and attract people to a farmer’s market table just to ask what it is

Monday, August 8, 2011

Blueberries Won't Grow in the Hot Desert. So... Let's Give it a Try!

Q. I am interested in planting various fruits in my backyard. One that I am curious about is growing blueberries in our region. Do you know how they do here? Would you have any recommendations? I did not realize the varieties of blueberry plants that are out there! In my search I also came across pink lemonade blueberries, I am definitely interested, but I do not want to put forth the effort if they will not be a productive plant in our area.


A. This is the case where your gardening skills are going to be challenged. They are definitely not suited to our climate and definitely not suited to our soils. So let’s give it a try!

This means we have to modify the climate they are in as much as possible and also the soils. Pick a microclimate in your landscape that will be as cool as possible yet still provide 6 to 8 hours of sunlight every day and out of the way of strong winds. This would most likely be an east or north side of a landscape that avoids late afternoon direct sunlight. Find a location or create a location that is protected from prevailing strong winds.

Next, modify the soil. Blend anywhere from half to 2/3 of the existing soil with a good quality compost. To this mix and sulfur that is as finely ground as you can find or in a liquid form. If you are not opposed to it, aluminum sulfate can help lower the alkalinity. It is not used much any more and may be hard to find.

Water the soil thoroughly and let it drain several times before planting. Use only southern high bush blueberries in the planting holes and space them according to the directions. Stake the plants securely in the soil the first season of growth.

You will need pollenizers so make sure you get the correct blueberries together for good fruit set. Drip irrigation can be used or you can flood the area with water from bubblers. Cover the planting area with 3 to 4 inches of wood mulch, keeping the mulch away about 6 inches from stems that enter the soil.

Grow them for one season and see how they do. If you see signs of leaf scorching on the edges you might want to put 30% shade cloth over the top of them to help them a bit from intense sunlight. Every year you should be adding compost and acidifying the soil with finely ground sulfur or aluminum sulfate plus a good fertilizer and a soil applied iron chelate containing EDDHA. This is done in the spring before you see new growth. This should help get you started.

Stop Horsin' Around With My Pear Tree!

Q. Short story, we had a horse get out of their corral while we were out of the house today for probably 4-5 hours. While out, he ate most of the bark off of 60% of the trunk of one of our pear trees. The tree has quite a bit of fruit on it right now. We are more concerned with saving the tree than this year’s crop. Suggestions or ideas on anything you would suggest we should do would be very much appreciated.


Pruning cut healing over. Notice the wood is rolling over
the dead wood in the cylinder of the tree. Smoothing out
rough damage on the edges will help promote faster closure.
Use a sterilized instrument.
A. Long answer. The good part of this is that your tree, provided it is healthy, will probably survive. I have had fruit trees with that much damage to the trunk survive in the past.

Your horse probably ate all the way down to the wood. This means that the tissue which transports food from the leaves to the roots is gone in that area as well as the tissue which transports water from the roots to the leaves.

With 40% intact on the trunk the tree may struggle but it should still survive. I would recommend that you mulch the ground around the trunk with wood mulch which you can obtain free from our orchard. Saturate the ground around the trunk of the tree with water 2 to 3 times each week.

Clean the wound created by the horse with a sharp, sterile knife, cleaning the jagged edges of the damaged bark so that it is smooth. You do not need to paint the wound with anything. Just let it go after you have traced the wound with your knife.

Make sure you fertilize the tree next January and each January while it is trying to heal. Enjoy the fruit. But next year thin the fruit out why it is the size of the silver dollar so there is only one fruit per cluster.

Summer Brown Dead Spots on Lawns

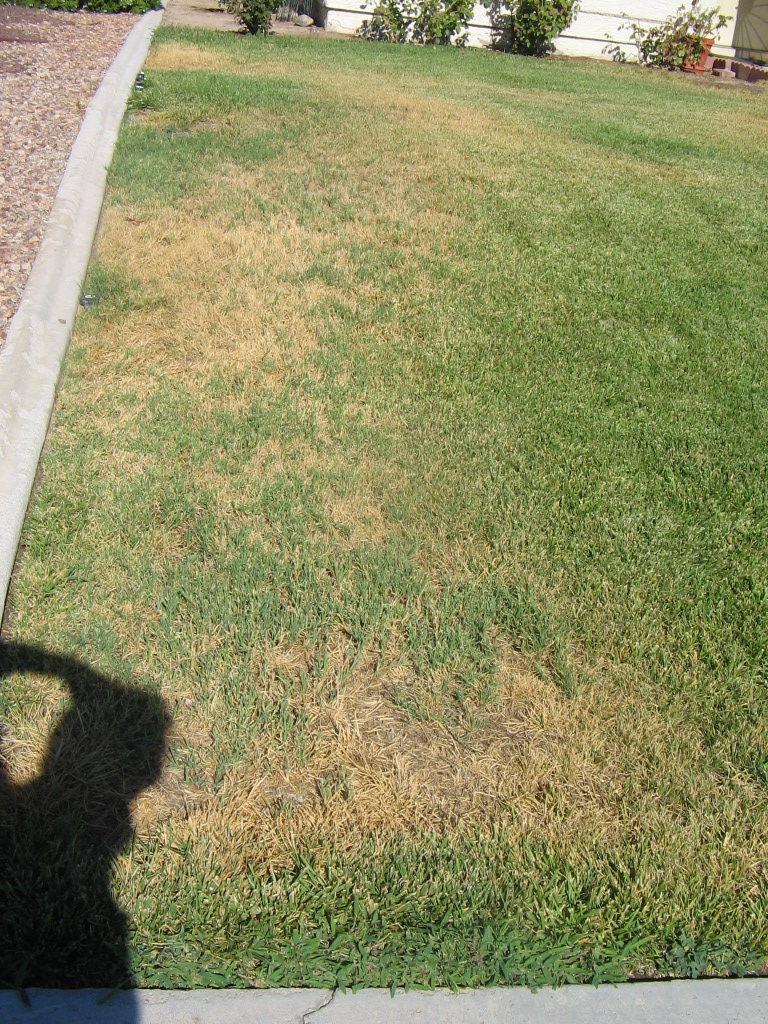
Q. I need your assistance. The photo I sent depicts the present condition of my backyard. It has patches of dry or dead grass. I don't know what caused the problem. Is there some way to revive the grass without going to the extreme of re-sodding? And what shall I do to prevent this in the future?
Lawn with patches of dead grass; damage is past
and now the grass surrounding the dead spots
is recovering

A. Thanks for the picture. The picture helps and it doesn’t help. It would have helped if I saw something in the picture that gave me a clue. But there is nothing in the picture that is distinctive to me. It would be interesting to know if those dead spots were in any kind of pattern in relation to your irrigation heads.

I did notice in the picture that whatever caused the damage appears to be gone. This would tend to eliminate irrigation as a problem unless you changed your irrigation schedule. If these dead spots occur in the same spots year after year it is usually associated with irrigation. I tend to think it is either insect or disease from your picture.

Browning due to poor irrigation coverage
by the sprinklers; darker green near the
sprinklers and brown between; not well defined
Let me just point out some weaknesses in the design that might contribute to the current problem. I tend to discourage homeowners from designing a turfgrass area other than straight lines. I know this might be somewhat boring but water from sprinkler heads tend to be thrown in straight lines.

Irregular lines or curving lines tend to cause those areas inside the curves to be under watered or the areas outside the curves and no longer in the turfgrass to be overwatered.

I noticed in your picture that most of the damage is closest to the non turfgrass area while the solid turf area are less damaged. Another point, those areas of the turfgrass closest to rock mulch, sidewalks or patios in full sun tend to use more water than those areas deep inside the turf area. These areas close to non turfgrass areas tend to be warmer and more prone to insect attacks than others.

Insect damage that is fresh tends to cause the grass on the edge of the damaged area to pull up freely from the lawn. If the insect damage is long gone, then it will no longer pull up.

Lawn diseases can also cause patterns like this. Unless a sample is sent to a qualified plant pathologist or we have seen the disease many times before it is a shot in the dark as to which disease it might be. From your picture, it is not a disease pattern I recognize.
Distinct horseshoe shape dying spots of summer patch
disease on winter overseeded perennial ryegrass

 
Since the problem is gone, there is probably no need to apply an insecticide or fungicide. At this point leave the dead grass alone and do not rake it up or you will open the soil surface to invasion by weeds. Since the cause of the problem is unknown it would be hard to tell you how to prevent it from happening again.

Around the end of September through mid October rake up the dead grass and broadcast the same seed or nearly the same seed in the dead areas and mulch the surface with top dressing and fertilizer.

White Fluffy Stuff on Cactus


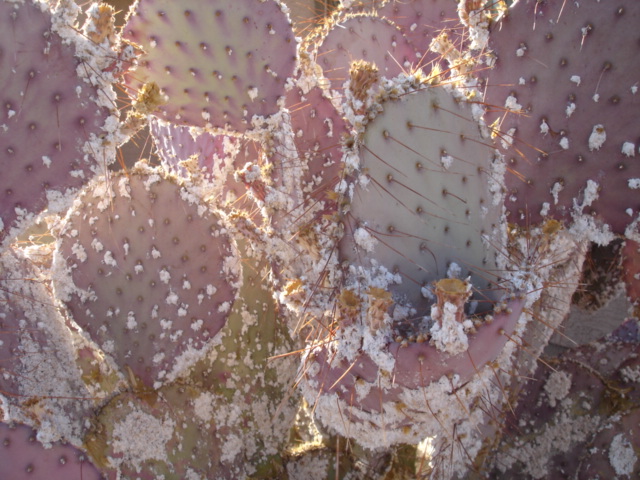
Cochineal scale on Opuntia cactus
  Q. At desertusa.com, I found out that cochineal scale is what is affecting my prickly pear cactus. Although it described the problem, there was no explanation on how to get rid of it. I used a hose to wash off the scale. Do I need to do something else to save my cactus?

A. Cochineal scale is that white, fuzzy stuff that you see on some cacti. If you crush it between your fingers it has this very pretty dark red color that oozes from inside the white fuzzy stuff. The scale insect itself is under this layer of white fuzzy stuff where it lies protected and can feed on the plant juices. They can infest a cactus quite quickly and can be difficult to control. They can be quite a problem on the edible cacti.


Red dye coming from cochineal scale

In Mexico they use hard pesticides such as Sevin to help keep them under control. We usually just use a sweep nozzle on the end of the hose and turn it on all the way. A strong, steady stream of water will wash the scale off of the pads.

The problem is that once infested you will probably have to hose them off once every week or two during the summer season. During the winter season it is not as often. You are right, this is Cochineal scale. This is not the same scale exactly that is used for the red dye but a very close relative and still gives off a wonderful color that can be used for dyeing.