Type your question here!

Thursday, July 25, 2019

How to Water Plants in the Desert

The most critical plant management issue when growing plants in the desert is how much water is enough, when to apply it and where to apply it.

Drip emitters are watering but there are no plants! Water where plants are located and if they are removed, don't forget to stop the water.

Secondary to this issue is how well the soil surrounding the roots hold onto the water or release it when the plants need it. In short, how much water should the soil hold and how much should it let go? (drainage).

How Plants Use Water

Plant roots take water from the soil and send it to the leaves. As plants get bigger, they have more leaves so their need for water increases. Plant roots are always trying to find more water. They may not go looking for water but they can find out where it is! 

Roots don't respect property lines. If trees find water, they grow in the direction.

Plants always try to become bigger. This is why plant roots grow into new areas of the soil where there is water. These new sources of water are tapped into by the growing plant roots. These new sources of water become very important to the plant as it gets bigger. 
When soil fills with water, it drains. The water that drains from the soil leaves voids in the soil that fill with air.

The ideal landscape soil holds on about 50% of the applied water but if there's too much, the soil releases it so the roots can "breathe". This is called drainage. In the ideal landscape soil, about 50% of the applied water escapes the soil as drainage. The end result after drainage is complete is about half of the soil holds on to water while the other half has released it and these places are then occupied by air.

One gallon of applied water to dry soil = 1/2 gallon remains in the soil and 1/2 gallon drains.

An ideal soil has about 25% water and 25% air between its soil particles.

Two Ideas About Watering

 There are two methods floating around about how to water. 

Gas Tank Method. Some advocate filling the soil surrounding the roots with water and letting the plant "drink" from this pool of water until it needs more. Think of it like filling a gas tank on a car. The gas tank is filled and you drive around as much as you want but you refill the tank when it's about half empty. In irrigation lingo, many plants are watered again when about half of the water held by the soil is gone. It's different in cars. Gas tanks are filled with fuel when its about three fourths empty or more. Allowing plants to use three quarters or more of the water in the soil, like a fuel tank, would kill most plants except cacti!

One gallon of applied water to dry soil = 1/2 gallon remains in the soil and 1/2 gallon drains. One quart of this water is used while one quart remains in the soil.

Image result for gas tank half full

The Daily Sip Method. The second idea about how to water gives "sips" of water to plants every day. People who follow this idea give plants a drink of water every day. These drinks of water are more often in the summertime and less often in the wintertime. Also, these drinks of water are taken more often in the summer months than the winter months. This isn't like filling a gas tank at all. This is more like drinking a glass of water. In the summertime you drink water more often and in the wintertime you drink water less often.

Every day give plants a "sip" until the plant uses one quart.
Image result for sip of water

Pluses and Minuses of Both Ideas

Gas Tank Method. The first idea, "filling the gas tank" lets the plants "drink" from this supply of water any time it wants or needs to. The easiest water for the plant to get is the water closest to the surface of the soil. When water is plentiful in the soil, plants drink from it luxuriously and greedily. Unfortunately, the plant must compete with evaporation of this shallow water into the air. Both the plant and the air are "tugging" at the same shallow source of water.  
 
Water was applied to fast for the soil to hold all of it or the soil couldn't hold anymore.
When the gas tank drops to maybe three quarters full, the plant drinks from it a little bit more, cautiously. It taps into water that is a little deeper in the soil. It's harder for the plant to take water from the soil when the soil holds on to it more tightly. As the available water in the gas tank drops to 50%, the plant finds it even more difficult to get water and tries to find this water in still deeper soil. But the plant is still "happy".
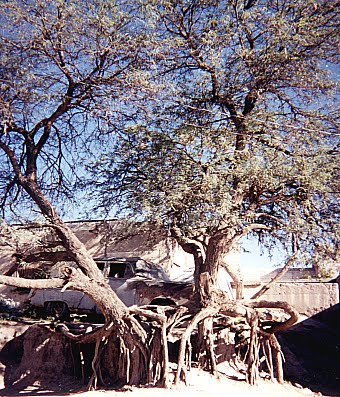
This mesquite tree is growing about 50 feet from a river. Its roots are growing deep because it of soil moisture from the river.

When this water supply in the soil, or gas tank, sinks to about 40% or less of the original amount, then that's when we begin seeing many plants starting to wilt during the hottest part of the day. This is our visual indicator that the plant can't get enough water for its leaves and newest stems. This can lead to permanent wilting; there just isn't enough water in the soil that the plants can find.
Mid day wilting of vegetables on a hot day. They will recover when it gets cooler but growth may be lost today.


A side note. Sometimes plant wilting is not because there isn't enough water available to the roots. It can happen when the air is so hot and dry that it's pulling the water from the leaves faster than the roots can find it. This can happen to vegetable transplants with tops growing too fast for their roots to send water to the leaves. It can also happen to newly planted fruit trees, shrubs and landscape trees. When this happens, it is called temporary wilting. As plant roots become established in the soil, temporary wilting may disappear.
Lettuce growing in plastic and straw mulch in Kosovo.

Another side note. Can you see the value of a surface mulch? Mulch is something applied to the surface of the soil that slows down the loss of water from the surface to the air, i.e., evaporation. When surface mulch is applied such as woodchips, rock or even plastic, evaporation slows down tremendously, improving the odds that plant roots will outcompete for the same water.
 
Plants growing in desert soils may grow better if woodchip mulch is used instead of bare soil or rock mulch.
The Daily Sip Method. The second idea, where daily sips of water are given to plants, requires regular, and sometimes daily inspections of plants. To do a good job using this idea, you should be very familiar with how much water different plants need. Otherwise plants receiving the smallest sips of water will dictate when to apply water to other plants. When these underwatered plants show signs they are not receiving enough water, they force us to apply water to all the plants receiving water at the same time as they do. 

This type of watering can be very wasteful and result in those plants, already receiving enough water, to get more. Hand watering plants not receiving enough water, instead of using the irrigation system, can reduce landscape water use and your water bill. But its time consuming.

A side note. Another drawback to this idea of watering is the encouragement in the growth of shallow roots on plants. Not terribly important with small plants, but when irrigating large trees this type of watering encourages plant roots to grow near the surface of the soil. A major reason for deep roots of trees is to prevent them from blowing over during strong winds. This type of watering encourages shallow roots to form on large trees. The formation of  "sip watering" and the formation of shallow roots leads to the blowing over of large trees.

This mesquite tree, (roots can grow to 200 feet deep!) blew over because it was irrigated with flowers and a lawn which makes shallow roots.


What's the solution?

1. Use the "gas tank method" when watering plants. The size of "gas tanks" depend on the size of plants irrigated. Vegetables, lawns and annual flowers require watering to a depth of 8 to 10 inches. Small and medium-sized shrubs and perennial vegetables should be watered 12 – 18 inches deep. Small and medium-sized trees should be watered 18 – 24 inches deep. Very large trees should have water applied 36 inches deep.

2. Use a soil moisture meter for knowing when to water again. Inexpensive houseplant moisture meters can be used for annual and perennial vegetables, lawns, annual flowers, small shrubs and perhaps even small trees and fruit trees. For larger plants, purchase and use a more expensive soil moisture meter. Measuring the moisture in the soil near the plant roots can give you an idea when the "gas tank" is approaching 50% full and it's time to water.

Moisture meters can be under $10 and others less than $100. For a few uses and shallow depths, choose the $10 version and be preparted for it to be thrown away after a time. They all have a gauge reading from 0 to 10, Dry to Wet.

3. Use a thin metal rod, like a 4 foot long piece of rebar, to determine how many minutes are required for an irrigation to deliver enough water to fill the gas tank. This metal rod can also be used to determine the size of the drip emitters (gallons per hour) needed to deliver that amount of water.
 A stick of rebar can be used for judging how deep water is draining.

4. Water the area under the plant to at least half the area under its canopy. For small plants this might mean using two emitters, medium shrubs four to six emitters, small trees and large shrubs 10 to 12 emitters and so on.
Water the soil under the canopy to AT LEAST half the area under it. This is not enough.

5. Apply mulch to the surface of the soil. For desert plants, rock mulch can be used. For non desert plants consider using woodchips. Vegetables will benefit from plastic mulch to warm the soil and keep it moist.


Rock mulch conserves moisture too. It just doesn't add anything back to the soil like woodchips can.
Did you like this information? Visit my podcast on this subject and learn more!

Wednesday, July 24, 2019

Desert Horticulture Podcast: Growing Tomatoes in the Desert

Join me in this special podcast on growing tomatoes in the desert if you ever wanted to try or just moved to the desert.

Growing Tomatoes if You Always Fail

Tomatoes are tricky in Las Vegas, but they typically don’t die suddenly, to get them to produce well. The idea of KISS (Keep It Simple Stupid) is always a good plan when doing something for the first time or when you move to the desert from a wetter place.
That's the end result we all want...big, home grown tomatoes. These were tomatoes grown near Mazari Sharif, Afghanistan. If they can do it, YOU can do it.

KISS steps for tomato growing:
  • Plant in early spring, Feb 15 or later depending on the weather and weather forecasts for the next two weeks. Local tomato transplants are usually okay. Sometimes you can plant early and get away with it and sometimes not. If planting late, pick cherry, grape or yellow pear types. Always use a "determinate" tomato until you want to experiment.
Start with 15 gal nursery container and fill it with potting soil for your first tomatoes. Dont use a smaller container than 15 gal. 

  • Select varieties that are known good producers; Champion, Early Girl, Patio, Jet Star, Roma for full sized tomato fruit. For smaller fruit choose cherry tomatoes such as Sweet 100 or grape tomatoes or yellow pear. They are very reliable. Select transplants that are about 6 to 8 inches tall and healthy. Avoid large transplants.
Select small transplants for the container. These transplants have a surface mulch of pine animal bedding around them to keep the soil most but you wont have to have it if planting in the cool spring months.

  • Pick a soil mix and not potting soil, compost, or something similar. It should be somewhat heavy and not light weight. Maybe in a couple years you can play around with different soil mixes but not at first.
I am holding Viragrow's Premium Garden Soil Mix. It is mixed about 1/3 compost and 2/3 sand plus some seaweed extract, rock dust and some other goodies. You dont have to use something this full of stuff but having the soil heavy and well drained helps establish transplants and is forgiving if you are not sure of your desert irrigation talents yet.

  • Try planting in new, 15 gallon containers first before going to a raised bed until you get the knack of it. Use an established soil mix known for growing tomatoes in the desert in the past for vegetables. Fill the container from the bag and then water it thoroughly so that the soil settles leaving a 1 inch headspace at the top. Locate them on the east side of a wall or building.

This is a five gallon plastic nursery container and it will work but the 15 gallon container is more "forgiving". It holds more soil so it doesn't run out of water as soon and doesn't heat up as fast.

  • This next part is a bit tricky. If the soil mix did not have any fertilizer in it, then water with a starter fertilizer mixed in the water used for watering. This can be a small bucket or can.
This is a water soluble fertilizer that can be dissolved in water and watered in the soil just after you plant. Its nitrogen content (the 15 on the left) is lower than the middle number (30) which is phosphorus. When planting transplants or seed it is important to have more phosphorus available to the plants than nitrogen. This helps get their roots off to a good start. The 15 on the right, potassium, is ALWAYS a good idea to have in a fertilizer. ALWAYS.

Fertilizers used for getting transplants and seeds off to a good start are fertilizers like this Arizonas Best Starter Fertilizer. It is a granular fertilizer that is mixed with the soil before planting.
  • Plant in this soil when it is moist. The first time you water, use water with a starter fertilizer in it. Use a clean digging device like a garden trowel. Remove the transplant from its container even if it’s a peat pot. If an expandable peat pellet was used with that netting on the outside, slice or cut the netting in several places until it nearly falls apart. Do this even if they tell you, you don’t have to. Plant it at the same depth it was in its old container into its new container and water it in until water comes out the bottom of the container. If there is no container, water it in until its muddy. Do this two more times in the next 24 hours.
  • Buy a soil moisture meter used for houseplants. It should cost less than $10. Stick the end in the soil about one inch and water next time when it reads 5. Use that soil moisture meter to tell you when to water until you feel the watering rhythm. If you aren’t sure if its time to water, use the soil moisture meter to tell you.
Soil moisture sensors like this one intended for houseplants will work in our soils but dont last very long. They fall apart after a few times.

  • If you applied a fertilizer when you planted the transplant, don’t apply any fertilizer until you see small fruit that formed from the flowers. Then start applying fertilizer, lightly, once a month.
Tomato fruit setting (right) and the flower open and ready for pollination (left).

Thursday, July 18, 2019

The Many Reasons Plants Turn Yellow

This is one of the most common questions I'm asked. Why is my plant yellow? In Desert Horticulture, the reasons can be many. I'll try to list here as many as I can think of and how to tell them apart.

Lack of Iron

Plants must have iron. If they don't, their newest leaves turn yellow. It's not totally correct to say it's a lack of iron. There is plenty of iron in the soil, it's just not available to the plant. The plant can't use it because of some chemistry problems involving the soil. The pH is too high or its alkaline. This type of soil chemistry turns the iron in the soil into something that the plant can't use.
Iron chlorosis when it's mild is on the new leaves and the veins of the leaves stay darker green than the blade. If this is early in the season, the future leaves may turn bright yellow with no green veins. Here it is on Apple.

Because of iron is going to be a big problem that season, the yellowing starts out early in the season and on progressively gets worse and worse. The first thing you see are leaves with a light green color with darker veins. As the season progresses the green veins may disappear and the leaf is just plain yellow. As it gets hot, many plants can't handle the heat anymore because they are not as healthy and the edges begin to scorch, turn brown.

Yellowing due to a lack of available iron, also called iron chlorosis, can cause severe yellowing in leaves and weaken them so much that they are much more susceptible to heat than they would be if they were healthy. Manganese deficiency will cause the leaves do look very similar to this but it's not as common as iron. Spraying the leaf with a little bit of iron solution and soapy water will tell you if it's iron or not.
Some plants have leaves that react differently when iron is a problem. But the yellowing is always on the newest growth.

Iron chlorosis looks different on bottlebrush but the yellow leaves are the newest leaves at the tips of the branches.
Control yellow leaves due to iron. If you know you have a plant that has this tendency every year, apply an iron chelate spread beneath it with lots of water to get it out of the sunlight and into the soil before new growth begins in the spring.Several chelates are available but I usually push people toward the chelate abbreviated as EDDHA. This is because this chelate works in all types of soil whereas other chelates may or may not.

This is an iron fertilizer containing the chelate EDDHA. Because of the soil chemistry, other chelates may or may not work in your soil. Using the iron chelate EDDHA works in all types of soils and it's a safe bet when looking for a soil treatment in the spring for correcting yellow leaves due to iron problems.
The second method of applying iron is to the leaves as a liquid spray. This is done later in the season when the leaves are out and applying an iron chelate to the soil may no longer work effectively. Watch my video on applying iron to the soil or apply an iron spray to the leaves. I don't have a video on doing the ion spray yet but hope to do it soon and post it on my channel. 

When making the iron spray concoction I would use distilled water, the iron fertilizer mixed in the water with about a tablespoon of liquid detergent mixed with it afterwards. Spray the leaves until this mixture begins dripping from the leaves.This spray concoction may need to be applied three or four times a few days apart to get it dark green. Another option you have is to do the soil application and the foliar spray at the same time. We have done that in the Ahern Orchard and had good luck with it in late spring or May.

Salts

Salts in the soil can also cause leaves to yellow but this is often times accompanied by damage to the edges of the leaves. The veins can appear green just like it was described above but the edges of the leaves are the telltale sign that salt in the soil may be the problem.

This is yellowing of the leaves of a pepper plant because the of salts in the compost mixed in the soil and the heat of the day. Edges of the leaves scorching was the telltale sign it was salt damage.
Fixing salt damage. There isn't anything that you can do to the existing leaves that show the yellowing and browning on the edges when salt is causing the damage. But the new growth will show improvement just threw better irrigation management. Flush the soil with lots of water to remove the high level of salts. The soil must drain the water for this to work. If the soil doesn't drain, then drainage is the problem combined with the salts. To fix that, you have to make the soil drain. A different topic.

Intense Sunlight and Yellowing

Some plants don't belong in strong sunlight.Know which plants can handle intense desert sunlight and which ones can't. Just because a blog or a YouTube video says you can plant it in full sun doesn't mean you can plant it in full sun in the desert. It depends on the plant. This is why Desert Horticulture can be so different from "normal" horticulture.

This cycad or Sago Palm has yellow leaves because it's in full sun near a hot wall and surrounded by hot rock mulch. This plant will perform much better in a cooler location, woodchip mulch with some filtered light.
Carolina cherry laurel is another plant that can show yellowing, similar to the cycad, if it's planted in intense sunlight and surrounded by rock mulch.
Know the plants going into your landscape and plant them in locations where they won't struggle. Just because some book or blog post tells you he can grow in full sun, that might be true in North Carolina but not in the Mojave Desert. That's why it's called Carolina cherry laurel. 

Sago Palm is native to southern Japan. Do you know any desert in southern Japan? Be careful of plants with the name "Japanese" in it such as Japanese blueberry. It's also not a good one to plant in full sun surrounded by rock for the same reason.

Nitrogen

Nitrogen is a plant nutrient supplied by many different types of fertilizers, animal manure and compost needed in large amounts by plants. It helps plants develop dark green leaves and lots of stem growth. In fact, the amount of nitrogen that plants receive is directly related to how green the leaves are and how much growth it produces.

A lack of nitrogen doesn't happen very often but mixing woodchips or sawdust in a soil or other things that decompose and are brown can cause a temporary lack of nitrogen in plants. The soil microorganisms responsible for tearing down these wood fibers require lots of nitrogen. If wood chips or sawdust is mixed in the soil these microorganisms will steal nitrogen away from plants so they can break down wood.

Just the opposite of iron, a temporary shortage of nitrogen in the soil will also cause yellow leaves but these will be the oldest leaves, not the youngest.

The yellow leaves of this corn plant are the oldest leaves at the bottom, typical of yellow leaves due to a nitrogen deficiency.

Wet Soils

Wet soils, either from watering too often or poor drainage, can cause yellow leaves in plants because roots begin to drown or suffocate. Suffocating roots as plants are trying to get bigger causes the plants to have fewer roots and decreases their chance to take up iron and manganese from the soil. This is sometimes called "water induced iron chlorosis".

Plant roots must have a supply of water as well as a supply of air. Plants are different in this regard. Lawns and palm trees can survive in soils that have lower amounts of air in them. Other plants like rosemary, Italian Cypress, bottle trees, and many of our desert plants need soils that drain easily and allow air to enter the soil. There are differences among plants and which can handle soils that have water in them and which ones can't.
Purple leaf plum leaves turn pink instead of yellow because they are purple when they are healthy. Purple leaf plum, like all plums, will not tolerate continuously wet soils. The leaves will begin to turn pink (its form of yellow leaves) because roots will begin to suffocate. The tree will not be anchored in the soil but will move easily when it's pushed.

Solving the wet soil problem. Amend the soil at the time of planting so that air can enter the soil as well as water. This helps water to drain. Know which plants can tolerate rock applied to the surface of the soil around them and which ones are better off with woodchips. Rock eventually causes the soil to stop draining. Woodchips help to keep the soil open. For instance, never put rock around roses, Photinia, mock orange, southern magnolia and other plants that come from places that have better soil than ours.

Put plants that have a similar need for wet soils and water on the same irrigation valve. Put desert plants together on another valve. Put non-desert plants together on one valve but don't mix them together with desert plants on the same valve.

Cold

Cold temperatures will sometimes cause "bronzing" or yellowing of plant leaves. We see this a lot in Palm trees, Sago Palm, evergreens like citrus and even

Sometimes cold temperatures can cause leaves to yellow.
Cold weather can cause bronzing are yellowing of Mesquite leaves. If it gets really cold, it can cause the leaves to die and drop even though people tell you it's Evergreen.
What can be done? Nothing. Wait for the new growth and new leaves to replace the damaged leaves from winter temperatures.

Desert Horticulture Podcast: Leaffooted Plant Bug, Weeds, Twisted Myrtle

Join me on this episode of Desert Horticulture. We will discuss the Leaffooted Plant Bug (does it deserve to be capitalized?), controlling some weeds like sandbur and puncturevine, planting horsetail, twisted myrtle problems, and ants climbing inside figs. This and more in this episode of Desert Horticulture.


Monday, July 15, 2019

Your Drip Irrigation System Needs Help

Q. I've been using adjustable  drip emitters and replacing them every year because they plug from the hard water. They sputter air or just don’t emit water when they start a watering cycle.  When I find one like that, I open up the watering rate until a steady flow is achieved, but it doesn’t seem to last.

A. Sounds like several possible problems going on with your drip system. Let’s start with the easy ones first. Make sure your drip irrigation system has a filter installed to prevent drip emitters from plugging and a pressure regulator to prevent high water pressure from damaging the emitters.

A pressure regulator (black and white on the left) and a screen filter canister (right) together inside an irrigation box. Arrows on them indicate the direction water should flow when installing them. 

            A removable flush cap must be on each of the irrigation lines so that the system can be “flushed” on a regular basis. This helps to prevent emitters from plugging. I will talk more about this in a minute.
Some flush caps unscrew to release water. 

           
The most popular filter for residential use is the inexpensive screen filter. It is oftentimes a black canister installed close to the irrigation valve used for drip irrigation. It is normally installed immediately downstream of the valve in the same irrigation box.
            The screen inside the filter should be removed regularly and gently cleaned or replaced if damaged. Clean the filter two or three times a year when using city water, more often if you’re using well water. The dirtier the water, the more often the filter needs to be cleaned.
Pressure regulators come in different static pressures and there are adjustable ones if you aren't sure of the pressure needed or it varies.

            Pressure regulators prevent the water pressure from rising above the limits allowed for the drip emitter to operate normally. They don’t increase water pressure if it is too low. Match the pressure regulator to the pressure range recommended for correct operation of the emitters. It’s more complicated with a large drip irrigation system. In cases like these, use adjustable pressure regulators.
Flushing can involve the use of valves, screw caps or be as simple as this figure 8.
            Flush caps or valves must terminate all drip irrigation lines that carry water. It is important to “flush” these lines by opening the irrigation line when the system is operating and let the water run until it comes out clean. Open each flush cap sequentially for each drip irrigation line the same time the filter is cleaned. Flush the line if repairs are done on the system that allows dirt to enter that might plug emitters. The number one reason for failure of a drip system is not flushing drip irrigation lines and cleaning the filters regularly and after repairs.

Air release valve manufactured by Jain Irrigation. It is inserted directly into polyethylene drip tubing to exhaust air in the drip lines. Water forces it shut.
            
Air release valves like this one from Netafim are also made to be screwed into PVC irrigation pipe as well.

Air release valves are an add-on to the drip system if trapped air is a problem or takes a long time for the drip emitters to start dripping water. Air release valves are inexpensive and exhaust trapped air in the system quickly before the irrigation lines become fully pressurized with water. They are usually installed at the end of a drip irrigation line or in combination with a flush cap or flush valve.
Adjustable drip emitters are convenient because you can open or close the emitter to deliver more or less water. But they are not precise and are not pressure compensated.
            Adjustable drip emitters are not “pressure compensated”. This means they deliver water at variable amounts depending on the water pressure and their elevation relative to other emitters. One reason I don’t like adjustable emitters is because of their lack of precision; when one adjustable emitter is opened to allow a greater flow of water, less water flows from the other emitters on the same line.

Messy Palm Trees are Females...Sometimes.

Flowers emerging from the spathe on a Canary Island date palm.
Q. We have several Mexican fan palms, plus a few identified as hybrid California and Mexican fan palms, in our backyard. They are sending out flower stalks and make a huge mess for anybody who has a pool. One of my neighbors said that only female palm trees produce these messy stalks. True?
Dates (fruit) produced by a female date palm.


A. There are hundreds of different kinds of palm trees and palms are variable whether they are male, female or produce both types of flowers on the same tree! For instance, both the Mexican and California fan palms have male and female flowers on the same tree. But the date palms, both the true date and the Canary Island date palm, are either all male trees or all female trees but they never have male and female flowers on the same tree.

Suckers from date palm. They can be removed and planted when they are older and their chances of survival are better. The suckers will be the same sex as the parent tree.

            So, if you have the California or Mexican fan palms then all of them are “messy”.  But date palms are different. Male date palms are less messy around pools than female date palms. Look for fruit on older female date palms if you aren’t sure whether they are male or female (they must be about six feet tall before females start producing fruit).
            It is nearly impossible to “sex” a tree before it starts producing flowers or fruit if grown from seed. Palms propagated from suckers will be the same sex as the parent tree. California and Mexican fan palms are started from seed. Date palms may be started from seed or suckers.

Take Fig Cuttings at the Right Time of Year

Q. I tried to start fig trees by cuttings taken from my big, sturdy tree and putting them in water or soil. Not much luck. How can I start new fig trees?

A. Figs are easy to start from cuttings provided you take them at the right time of year, the cuttings are the correct age and they are placed in a soil or medium that drains water and free from disease. They can also be started by air layering or rooting suckers at the base of the tree trunk. Placing cuttings in jars of water or using garden soil can lead to drainage and disease problems.
Suckers growing from the base of the trunk can be covered with soil, kept moist and they will grow roots. These rooted suckers can be potted and put in indirect light until fully rooted and then planted.
Air layering or marcottage can be used to form roots coming from damage done to stems on many different types of trees. Just do it at the right time.

            Cuttings taken from new growth in the spring are 6 to 8 inches long and range in diameter from pencil sized to as big as your thumb. With a sharp, sanitized pruning shears remove a length of new growth. Cut this new growth into pieces just below a node on the bottom and just above a node on the top. Include at least four nodes on each cutting and remove any leaves present on the cutting.

Cuttings don't have to be from large stems.

            Push these cuttings into perlite or sanitized potting soil in a clean container that drains. Stick these cuttings upright, a couple of inches apart, so that two of the nodes are beneath the soil or media and two are above. Use a rooting powder for a larger number of roots that are more vigorous.
Wine grape cuttings stuck in an amended soil and rooted.

            Place this container out of the direct sun but where there is plenty of indirect sunlight and keep it moist. Rooting occurs first followed by leaf development. Leaf development is a sign rooting has occurred.

Grape cutting forming roots at its nodes.

            Figs can also be started from the suckers at the base of the tree or by air layering. The base of the tree is mounded with soil around the suckers and kept moist. Damaging the sucker before mounding encourages root development. Traditional air layering methods can be used but keep them in the shade of the canopy so it is not damaged by direct sunlight.

Main and Briba Figs Come from Different Locations on the Same Branch

Q. You said the main crop of figs is the second crop of figs. But on my Black Mission fig, the first crop has large fruit, and the second crop, although much more plentiful, has fruit that is about 1/3 the size. Both are delicious.

Fruit size has more to do with the distribution of "food" for fruit growth and the number of fruit it is divided into.


A. The size of the fruit has more to do with the total number of fruit growing on the tree; the fewer fruit on the tree, the larger each individual fruit becomes. The term “main crop” has more to do with where on the tree the fruit originates.

Picture showing both Briba and Main crop figs coming on at the same time but at two different locations on the same stem.

            Fruit from figs comes first from stems that grew last year as well as a second crop on this year’s stems. “Main crop” figs are only produced on stems that grew this year. The early or first figs, called the “Briba crop”, come from stems that grew the previous year.
            Some people claim that “Main crop” figs taste better than the Briba crop figs. I have never tasted any difference between the two. But generally smaller figs have more flavor than the larger figs and there is a difference in taste between different varieties of figs. 

Saturday, July 13, 2019

Progression from Raw Desert to Vegetable Crops

This is my foot on top of some raw desert soil in North Las Vegas, Nevada in the Eastern Mojave Desert. Notice the color. It's almost the same color as the rocket came from. There is no organic matter in this soil. Why? Because there wasn't much growing in it to begin with. Why? We get 4 inches of rain in the Mojave Desert when we're lucky and temperatures can reach 120° F (50C)

Desert Soils Are Varied


People think that all desert soils are the same. They are not. They are as varied as non-desert soils. Non-desert soils vary from dark chocolate brown and almost black to light brown chestnuts of the prairies. That brown color is a dead giveaway regarding the amount of organics in the soil, that is dead plant life that is rotten and you can't see it anymore. Just the color remains for the eye to see.
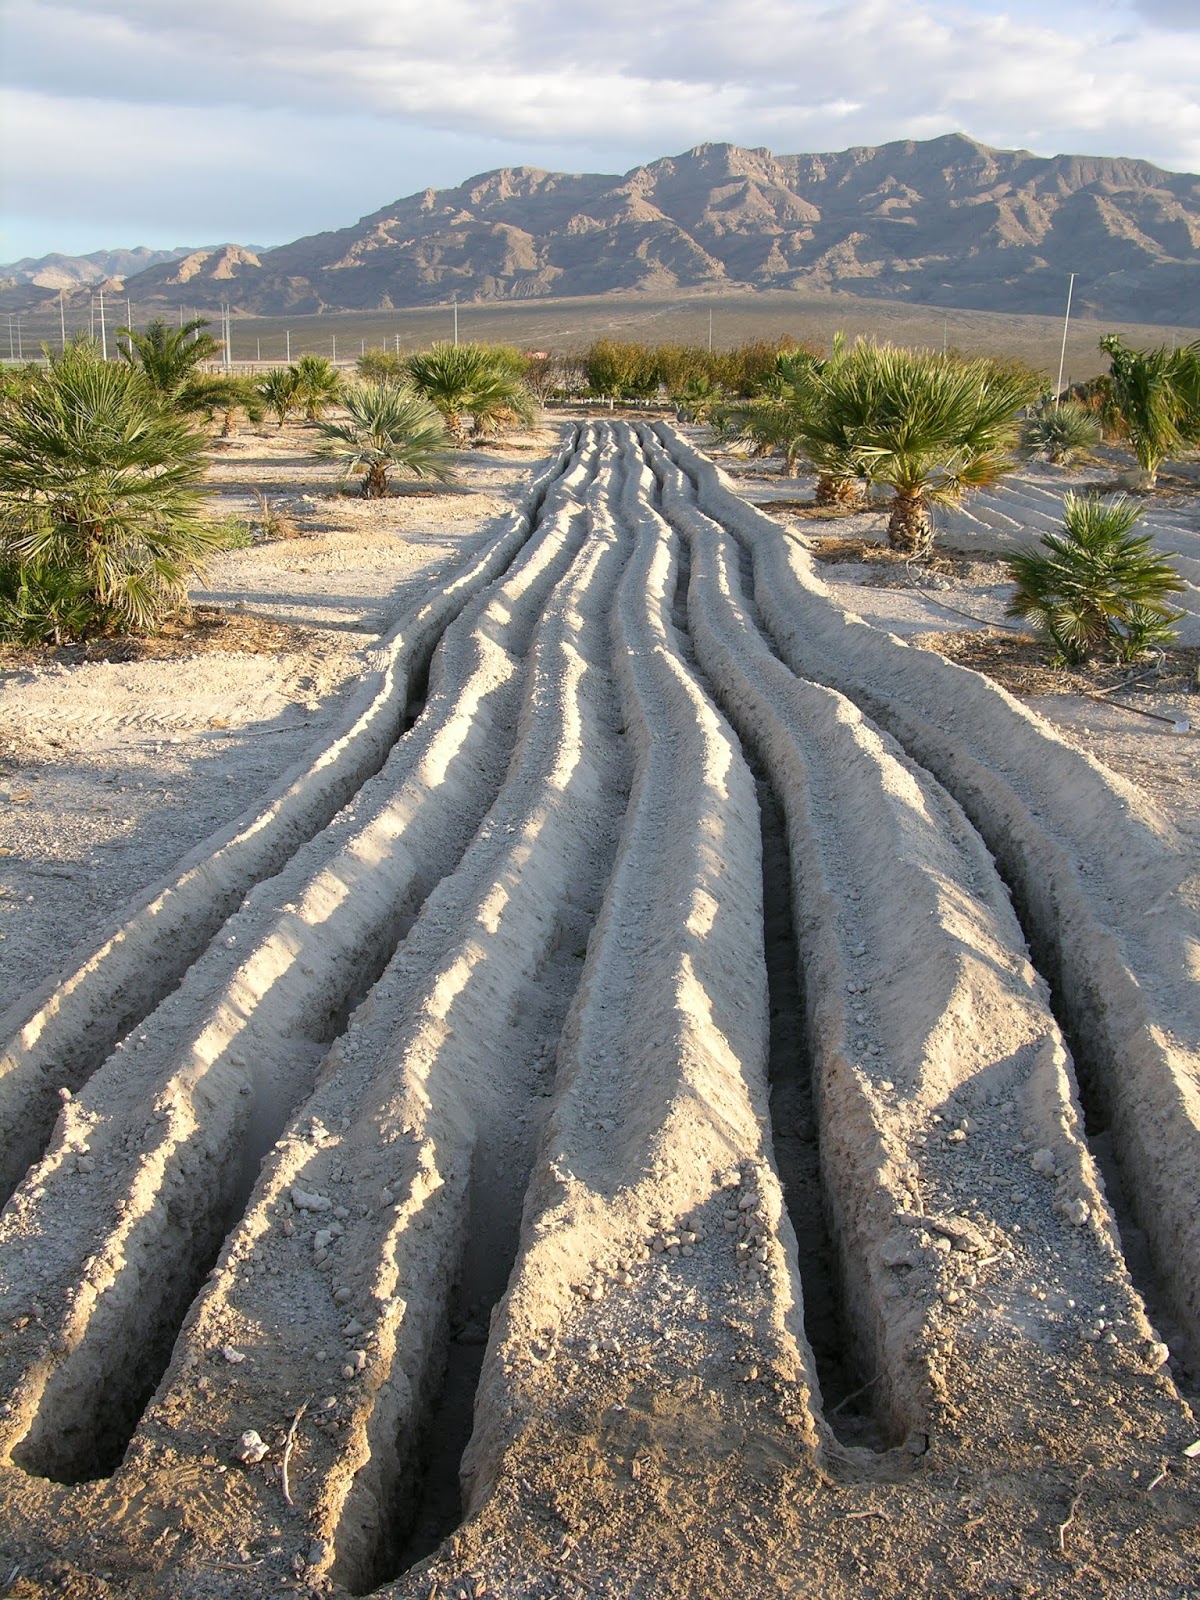
This is raw desert Sandy loam soil. From the color of it you can tell there is extremely little organics in this soil, a.k.a. O M or organic matter. As soil organic matter increases, soils become darker and less like the parent rock it came from. Two ingredients are needed to make this happen: organics and water. The color of this soil is because of a lack in rainfall and a lack of dead plants in the soil. A walk behind trencher was used to cut these trenches in the soil about 30 inches deep. Otherwise you needed a pick. These trenches will be filled with water and compost and then collapsed.

Rainfall Adds Organics to the Soil (Irrigation = rainfall!!!)

The soils in the Sonoran and Chihuahua deserts are vastly different from the Mojave. They are a better quality, they have more organics in them so they are a little darker brown in color, they are lower in salts, a little bit lower in alkalinity and they aren't as problematic as Mojave Desert soils. In other words, you are less likely to run into pockets of toxicity such as boron, sodium and chlorides. Why? The principal reason why is because of rainfall.

Compost and water was added to this soil and the trenches collapsed. The soil was allowed to dry until it was workable with the tractor and implements. The compost added to the soil covered the area 2 to 4 inches deep before it was cultivated as deeply as possible, usually 8 to 10 inches deep.Adding organic matter such as this compost to the soil will do nothing if water isn't applied as well.

Research from Desert Ag Stations

If desert soil was previously in agriculture; that is, irrigation water was applied and plants were grown in it, then of course the organic matter content of that soil will increase year after year until it hits a plateau. Maybe that plateau might be 1% or even 2% but a far cry from the one tenth of 1% found in many of the Mojave Desert soils.Following research performed in previously irrigated desert soils may not give you the same results as planting in raw desert soil.

This is the reason why some of the agricultural experiment stations in the desert come up with some different results when growing plants in desert soil. Knowing it is desert soil is not enough. You must also ask what the organic matter content is to get a good handle on how it will perform and how you must manage it.


Compost is cultivated into the moist soil as deeply as possible, hopefully at least a 12 inches. Once a deep cultivation is done to this rod does soil, the compost is further mixed by using more cultivating tools. Water was added to the soil after the compost was added but it was allowed to dry until it was workable and the tractor and the implements did not compact it. Never ever cultivate a wet soil. That's a big no-no.In small gardens double digging the plot helps in this phase.

Mix Organics Deep and Thoroughly throughout the Soil

Mix organic materials like good quality compost as deeply in the soil as possible. Remember, you will be growing root crops as well as asparagus which needs deep, well-drained soils. Rocks in these soils cause crooked carrots and crooked asparagus spears.The perfect soil for root crops is a Sandy loam with very few rocks in it.

The final mixing of compost into this soil is done with the disc. In home gardens are Rototiller works just fine but don't pulverize the soil. Stop when the organics are mixed and the soil is still "crumby". Over tilling the soil or working the soil too much can cause it to turn to a powder and seal the soil surface making it difficult to irrigate and grow crops.

Shaping the Beds

For high-value crops and at high planting densities it is important to keep plants in separate areas from where people walk. One method is to use raised beds. The least expensive method is to create natural raised beds about three and a half feet wide without constructed side walls. It's easy to do and not expensive. Let the soil maintain the edges of the bed rather than wooden 2 x 8s.

Once the soil has been prepared it can be shaped into three and a half foot wide raised beds with natural sloping sidewalls. Walkways are created with a flat nosed shovel between the beds and throwing the prepared soil from the walkways on top of the raised beds. When the walkways are completed, a lawn rake is used to flatten the surface of the raised beds. For long raised beds I use a landscape rake. People walk in the walkways only unless they are planting or harvesting vegetables from the raised beds. Weeding, fertilizing and irrigation repair is done from kneeling boards with people's tootsies only in the walkways.

Raised Beds with Constructed Sidewalls

Another method is to construct raised beds with sidewalls. Sidewalls can be made from anything but lumber is common. Soil for transplants and seed should be firm but not hard or soft. Walking on top of the raised beds, your feet should sink no more than half inch into the soil when finished. Settle the soil with water from a hose and sprayer.

Here is a constructed raised bed with wooden sidewalls at Viragrow. They test their soil mixes in raised beds and container's before releasing them to the public.
A fabulous job constructing raised beds was done by my friend Chris Alexander. My hat is off to him and the methods he's used in constructing his raised beds.


Saturday, July 6, 2019

Removing Palm Seedlings from the Lawn


Q. I have a mature palm tree that dropped seeds onto my lawn. Now I have hundreds of palm shoots growing out of the grass. I’ve tried weed and feed products, but they don’t kill them.  Can you give me any suggestions?
Poem seedling pulled from the soil after germinating

A. Palm seeds can live in dry soil for a long time. When they finally get water, they all germinate at once. Keep your lawn thick and dense by mowing high, watered regularly and fertilize it four times a year. Seeds that fall into it have less chance of getting established.

            Try mowing palm seedlings. If the seeds come from a palm that doesn’t sucker from the base, there is a good chance that mowing will kill the palm seedlings. Many palms have a single, central bud at the top of its trunk and once it’s killed or removed the palm dies.
            I know the task is daunting, but palm seedlings pull from the soil easiest immediately after an irrigation and when they are about 12 inches tall.

try this tool to remove palm seedlings

            As a last resort, try lawn weed killers that contain dicamba (Banvel) or triclopyr (Garlon) as part of the ingredients on the label. Both these weed killers control weeds that become woody. Use the highest rate permissible on the label. Mow the lawn first and then apply the weed killer.